Over the last decade, we have seen a considerable increase in the number and quality of technologies available to archaeologists for documenting the remains of the past. In particular, remote sensing technologies have provided new opportunities for research aimed at larger scales of analysis (Comer and Harrower Reference Comer and Harrower2013; Parcak Reference Parcak2009; Wiseman and El-Baz Reference Wiseman and El-Baz2007). However, these technologies present us with new challenges that need to be addressed in order to maximize their effectiveness, such as obtaining the best ground resolution possible in order to document and monitor every single detail of archaeological sites (Boyle Reference Boyle2015; Gutiérrez et al. Reference Gutiérrez, Erny, Friedman, Godsey and Gradoz2016; Mascort-Albea Reference Mascort-Albea, Ruiz and Romero-Hernández2014; Parcero-Oubiña et al. Reference Parcero-Oubiña, Mañana-Borrazás, Güimil-Fariña, Fábrega-Álvarez, Pino and Borie2016; Siebert and Teizer Reference Siebert and Teizer2014; Wechsler et al. Reference Wechsler, Lipo, Lee and Hunt2016). In this article, we present a methodology that increases the effectiveness and precision of the use of unmanned aerial vehicles or drones for the documentation of sites built in complex topographic settings, particularly on mountain slopes, with really high-resolution photography.Footnote 1 The methodologies for site documentation using drones described in this article were developed originally as part of the ground-truthing efforts associated with GlobalXplorer, an online platform that uses citizen science and remote sensing, and funded by the National Geographic Society (Yates Reference Yates2018).
THE “DRONE REVOLUTION” IN ARCHAEOLOGY
We are truly living in a “drone revolution” era, in which autonomous, remotely controlled flying machines, both fixed-wing and multirotor, are being employed in an increasing number of activities (Brooks Reference Brooks2012; Campana Reference Campana2017; Colomina Reference Colomina2014). Archaeology is not exempt from this revolution and was actually one of the early adopters of drones for the documentation of excavations, sites, and regions. As drones are becoming less expensive and more precise, the generalization of their use is extending to more tasks, some of which are new developments that could not have been done without drones. This is the case for archaeological surveys of inaccessible sites and the precise and repetitive monitoring of large areas. One of the latest advancements in drone technology has been the development of software that allows researchers to plan missions with a great deal of accuracy, controlling almost every setting in the way a drone flies, the path it will follow, and what its cameras do. These programs, which we will call generically autopilot (based on DJI Ground Station Pro terminology), are allowing yet another development in drone usage, one in which high precision becomes the standard.
Yet one shortcoming of both drones and autopilot programs is that they have been developed thinking almost exclusively of rather flat terrain, agricultural fields, or landscapes with few topographic features, rolling hills, and low mountains (Floreano and Wood Reference Floreano and Wood2015; Harrison-Buck Reference Harrison-Buck, Willis and Walker2016; McNeal Reference McNeal2016). Consequently, flying paths are often defined by a single height. Flying and taking photos from an even altitude should be ideal if the subject matter were indeed laid on a flat surface. In most autopilot programs, there is no way to change the altitude of the flight once the mission is launched, nor is there an easy way to plan a flight with differing elevations. In the few programs that can change altitude as they go from one way point to another, the information that users have to determine the altitude of the terrain is not completely reliable, and even if it is, the constant change of heights is too battery consuming. This might not be a problem in most activities, but for drones it can be disastrous, since a mistake on terrain height might cause the drone to crash into the ground or for it to fly so close to the ground that no overlapping images are obtained. Moreover, as we will see in the following section, the inability to keep a constant altitude over the ground has a significant impact on the resolution of the images obtained during the flight. This shortcoming is changing slowly, as laser altimeters are included with more advanced drones. This will become critical, for instance, when drones are able to carry heavier and more sensitive equipment that make it necessary to fly slowly at a fixed altitude.
RECORDING SLOPES: FLIGHT HEIGHT VERSUS PHOTO RESOLUTION
Two factors determine the quality of the photos taken with a drone and, consequently, the ground resolution of both 2D and 3D models and the images that are used to produce them: (a) the height, the distance between the camera and the terrain or ground surface; and (b) the camera parameters (megapixels, sensor size, and focal length). The higher the drone flies, the lower the ground resolution. Also, the better the parameters of the camera (megapixels, sensor size, and focal length), the better the photo quality. In Figure 1 we can see how three different cameras perform at different heights. Keep in mind that higher-ground-resolution images will produce more detailed orthophotos, and the way to obtain these is by flying low or by using a more powerful camera. Nevertheless, flying low requires more photos to cover an area.
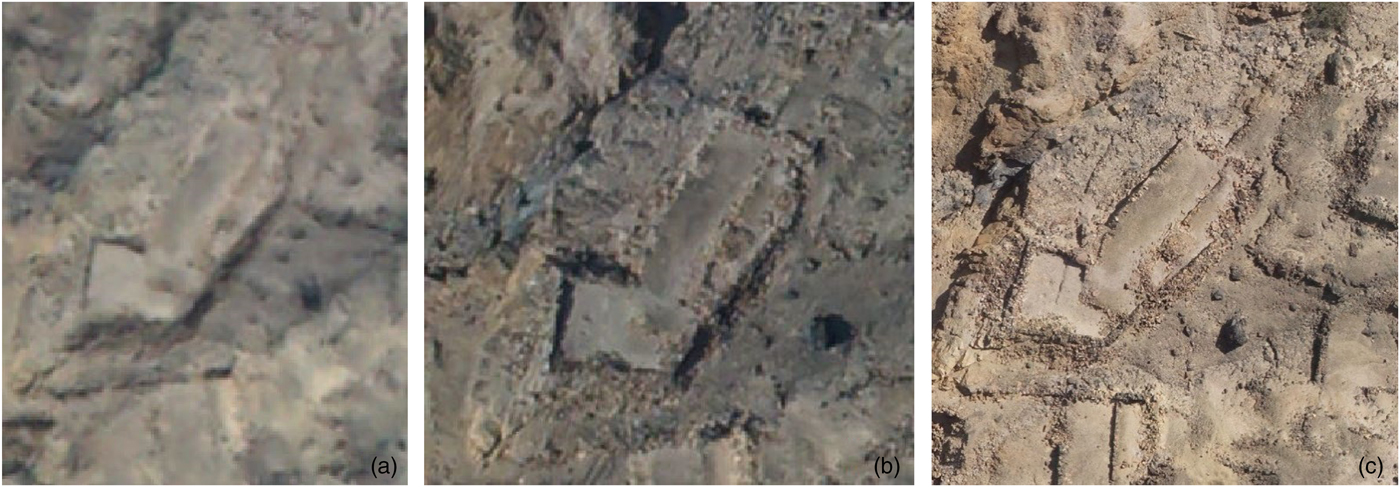
FIGURE 1. (a–c) Differences in resolution and image sharpness due to the height of the camera: (a) 700 m; (b) 470 m; (c) 50 m. In all three cases the camera had a resolution of 24 MP.
Take, for example, a flight over 50 ha (500,000 m2) carried out through autopilot using a drone equipped with a 20 MP camera with a one-inch sensor and a focal length of 8.8 mm. Setting the front and side overlap values at 65%, completing such a mission will require approximately 285 photos at a height of 100 m and approximately 2,523 photos at 25 m. In the first case, at 100 m, the resolution will be 2.7 cm/pix, while at 25 m, the resolution will be 0.7 cm/pix (see Tables 1 and 2). It is important, before launching the drone photographic mission, to define the resolution we want to obtain in the 2D and 3D products and to adjust the parameters of altitude and photo resolution to correspond with the expected product resolution. These considerations are complicated if the surface being recorded is not even, because while the camera resolution will remain constant, the altitude will increase or decrease as the drone is farther from or closer to the surface. This article focuses on the effects these differences have in the products obtained using aerial photography and photogrammetry and presents a methodology that attempts to solve the problems posed by the incline of the sites to be recorded.
TABLE 1. Relationship between Recorded Area, Flight Time, and Number of Photos for Drones DJI Mavic, Phantom 4, and Phantom 4 Pro, with Parameters Set at 65% Side Overlap and 65% Front Overlap.

TABLE 2. Resolution in Photos Taken at Different Heights and Other Characteristics for Drones DJI Mavic Pro, Phantom 4, and Phantom 4 Pro.

SHORTCOMINGS OF SINGLE-ALTITUDE FLYING AND DOCUMENTING SITES
In 2012, we started flying drones and documenting archaeological and heritage sites in Peru. Thus far we have recorded more than 1,000 sites in the coastal lowlands and the Andean highlands of the country. In the beginning drones were not only expensive but rudimentary, with oversized batteries, little or no telemetry, and almost no way for us to see what the camera was photographing. Since we began working in sites located in the rugged Andean mountains, it became apparent that much of what the literature covered, beautiful sites laid out on flat terrain, did not correspond to the kind of setting we were getting in Peru. Little were we aware not only that flying in such conditions, with steep mountains and pronounced slopes everywhere, was harder and more dangerous but that the quality of the images we were obtaining was below the standard we wanted to achieve. Attempting to record sites located in steep environments made visible the problem of the low quality of the photogrammetric products, given the significant height differences between the recorded surface and the drone camera.
We first encountered this problem flying the northern San Ildefonso Mountains in December 2015 with a Trimble UX5 fixed-wing drone equipped with a 24 MP Sony Alpha Nex 7 camera. The mountains started at 30 m above sea level (asl) and peaked at 319 m. In contrast to multirotors, fixed-wing drones need collision-safe surroundings due to the wide turns they make (Castillo Reference Castillo, Chapoulie, Sepúlveda, Del Solar Velarde and Wright2018). Thus, the decision was to fly above the mountains, at 460 m asl. At this height the difference between the flight path and the peak of the mountain would be 141 m, while the difference with the foot of the mountain would be 430 m. The lack of resolution that would result from the high elevation of the flight would have been compensated by the high resolution of the camera. Flying in this form is typical of fixed-wing drones, particularly the larger ones. Some resolution is sacrificed, but very large coverage is gained, with a high degree of safety. The problem is the great difference in the resolution of the photos taken of the top of the site (141 m) and of the bottom (430 m), which will affect the quality of the photogrammetric process.
An even more striking example of steep slopes where the single-altitude flying strategy reveals its shortcomings is San Juan de Iris. This is a town in the highlands of the Province of Huarochiri, 100 km east of Lima. The town sits at 3,400–3,500 m asl, 700 m above the Santa Eulalia River. The modern town of San Juan de Iris is surrounded by an ancient, but still used, system of terraces locally known as andenes. In September 2016, we flew the town and its surrounding terraces as part of a study of cultivation patterns on the ancient terraces.
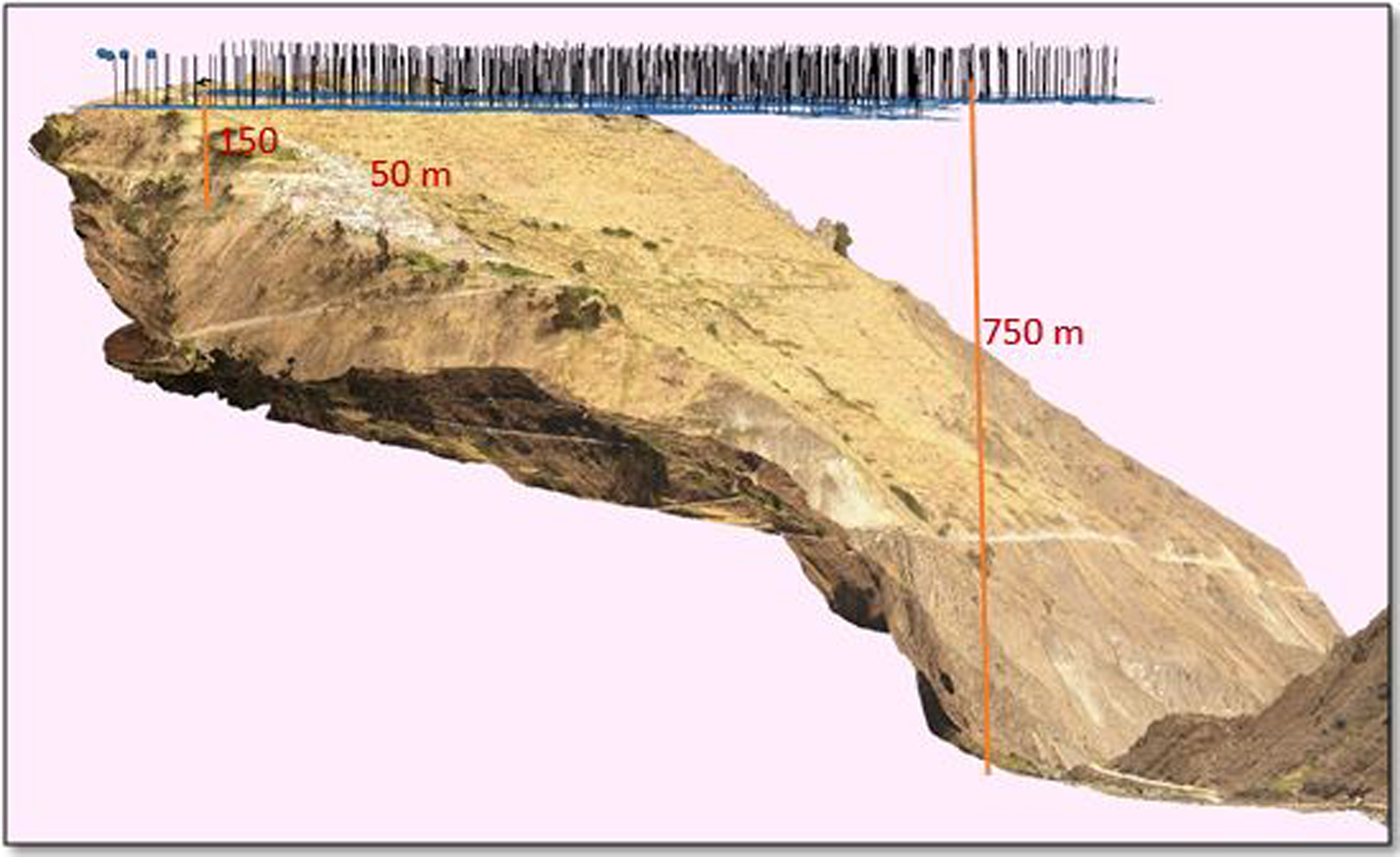
The complications when flying San Juan de Iris are the extreme vertical differences between one end of the town, at the top of the mountain at 3,500 m, and the other, at the bottom of the river at 2,800 m; that is, 700 m below. In terms of flying, which started 50 m above town, at 3,550 m asl, there was no problem. The DJI Phantom 4 flew without a problem at that height, although a warning signal appeared on the controller reminding us that the altitude was above 3,000 m. The mission was flown on autopilot, with a predefined polygon, altitude set at 50 m above the home point, and overlaps of 80%.
Although the height of the drone remained constant throughout the mission, 50 m above the home point, the distance between the drone and the surface changed dramatically because of the slope. By the time the drone was overflying the town of San Juan de Iris, the distance between the camera and the ground was already 150 m. At the edge of the flown area, when the drone was flying directly above the river, the altitude was 750 m (Figure 2).

FIGURE 2. Differences in the distance between the drone and the surface when flying at constant height on a steep slope. The first line indicates the distance at the home point; the second one, above town; and the third, above the river.
Variations in height had a direct impact on the resolution and quality of the photos. In Figure 3 we can see the size and resolution of two cars, the first one parked in the plaza of San Juan de Iris, 150 m below the drone, and the other in the bottom of the valley, down by the river, 750 m below.
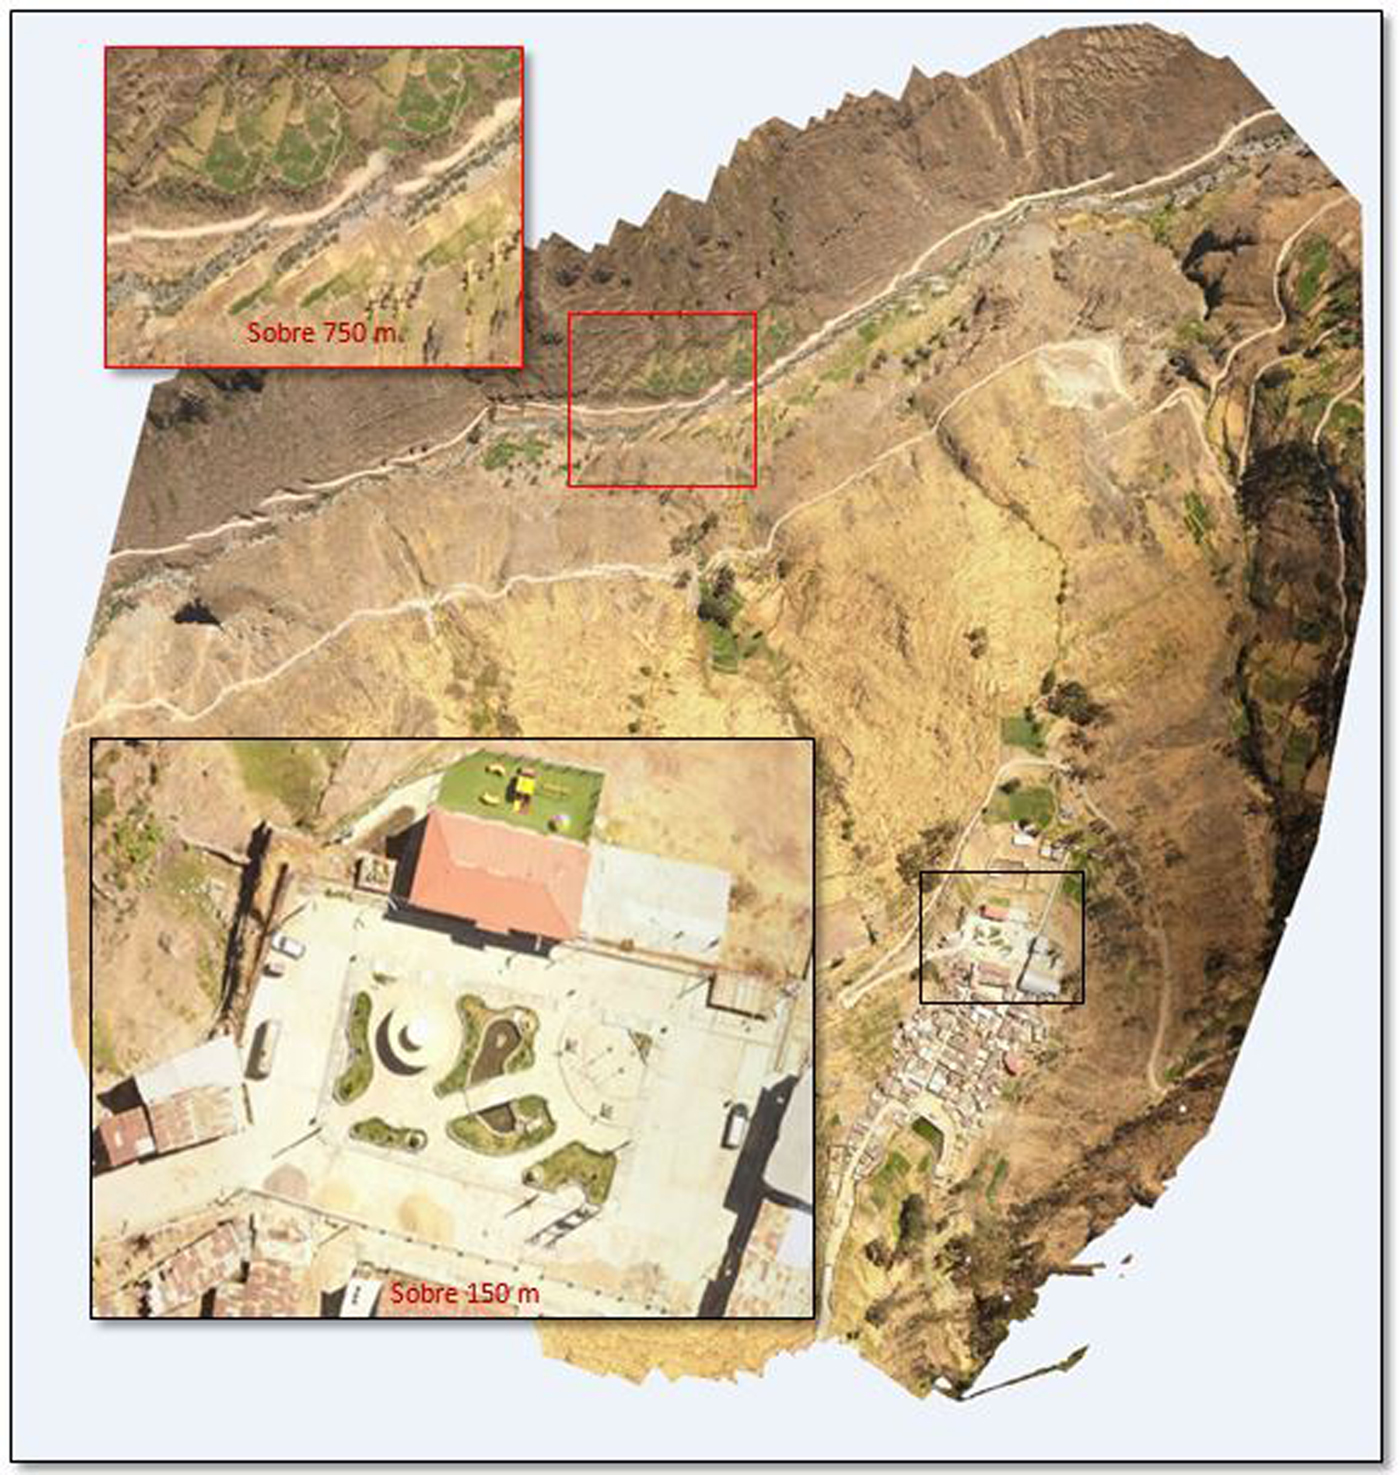
FIGURE 3. Photos taken at 150 m and 750 m altitude. Notice the size of the car parked in San Juan de Iris's main plaza.
The example and the challenges of documenting the town and fields on the slopes of San Juan de Iris are by no means unique, but they are typical in Andean communities throughout Peru and also in mountainous terrain close to the coast, like the San Ildefonso Mountains. While drones are now capable of flying up to 5,000 m asl, it is clear that the flying software and the autopilots are not adapted to huge changes in terrain height, presuming that the distance between drone and surface is the same throughout the mission. The solution reviewed thus far, flying at a regular height above the highest point, works in terms of the safety of the equipment, but it does a poor job in terms of collecting the correct information, something that can only be achieved if the distance between the terrain and the drone is kept constant and low. Some attempts have been made to make the drone follow the terrain, moving up and down as the surface changes or based on information from a previously collected digital elevation model (DEM), but as long as that capacity is not there an alternative has to be developed to record complex surfaces, particularly slopes.
DEVISING AN ALTERNATIVE METHODOLOGY: FLYING SLOPES IN STEPPED POLYGONS
The shortcomings of flying all sites as if they were lying on a flat surface had already become apparent by the time we began our attempts to more carefully record sites in the San Ildefonso Mountain Range, located in the Jequetepeque Valley of the La Libertad region, northern Peru (Castillo Reference Castillo and Castillo2010; Castillo Reference Castillo2014; Hecker and Hecker Reference Hecker and Hecker1990; Mauricio Reference Mauricio and Castillo2004; Swenson Reference Swenson2004; Figure 4). Particularly complicated was flying and documenting the Late Moche sites of San Ildefonso and San Ildefonso Norte due to their steepness. San Ildefonso is an area of approximately 250 ha that includes three large sites, with altitudes ranging from 30 to 270 m asl. The 240 m of slope, the difference between the lowest and highest points, challenge the traditional way we record a site with a drone, particularly if the objective is to produce detailed 2D images and 3D models. Traditionally, we would fly sites like these from their highest point, in this case at 270 m asl. From this point of departure, the drone would be flown at an elevation of 25–200 m, depending on the resolution of the images we want to obtain, the flight time, and environmental conditions. However, because the altitude of the drone is constant but the surface slopes down, the distance between the camera and the surface increases as we move away from the top. So, if we fly the drone at 50 m above the highest point, at 320 m asl, some photos will be taken 50 m above the highest point of the mountains, while, on the lower end of the site, photos will have a 290 m difference between camera and ground surface. This difference will produce defective 2D and 3D models once we run the photos through photogrammetry software.

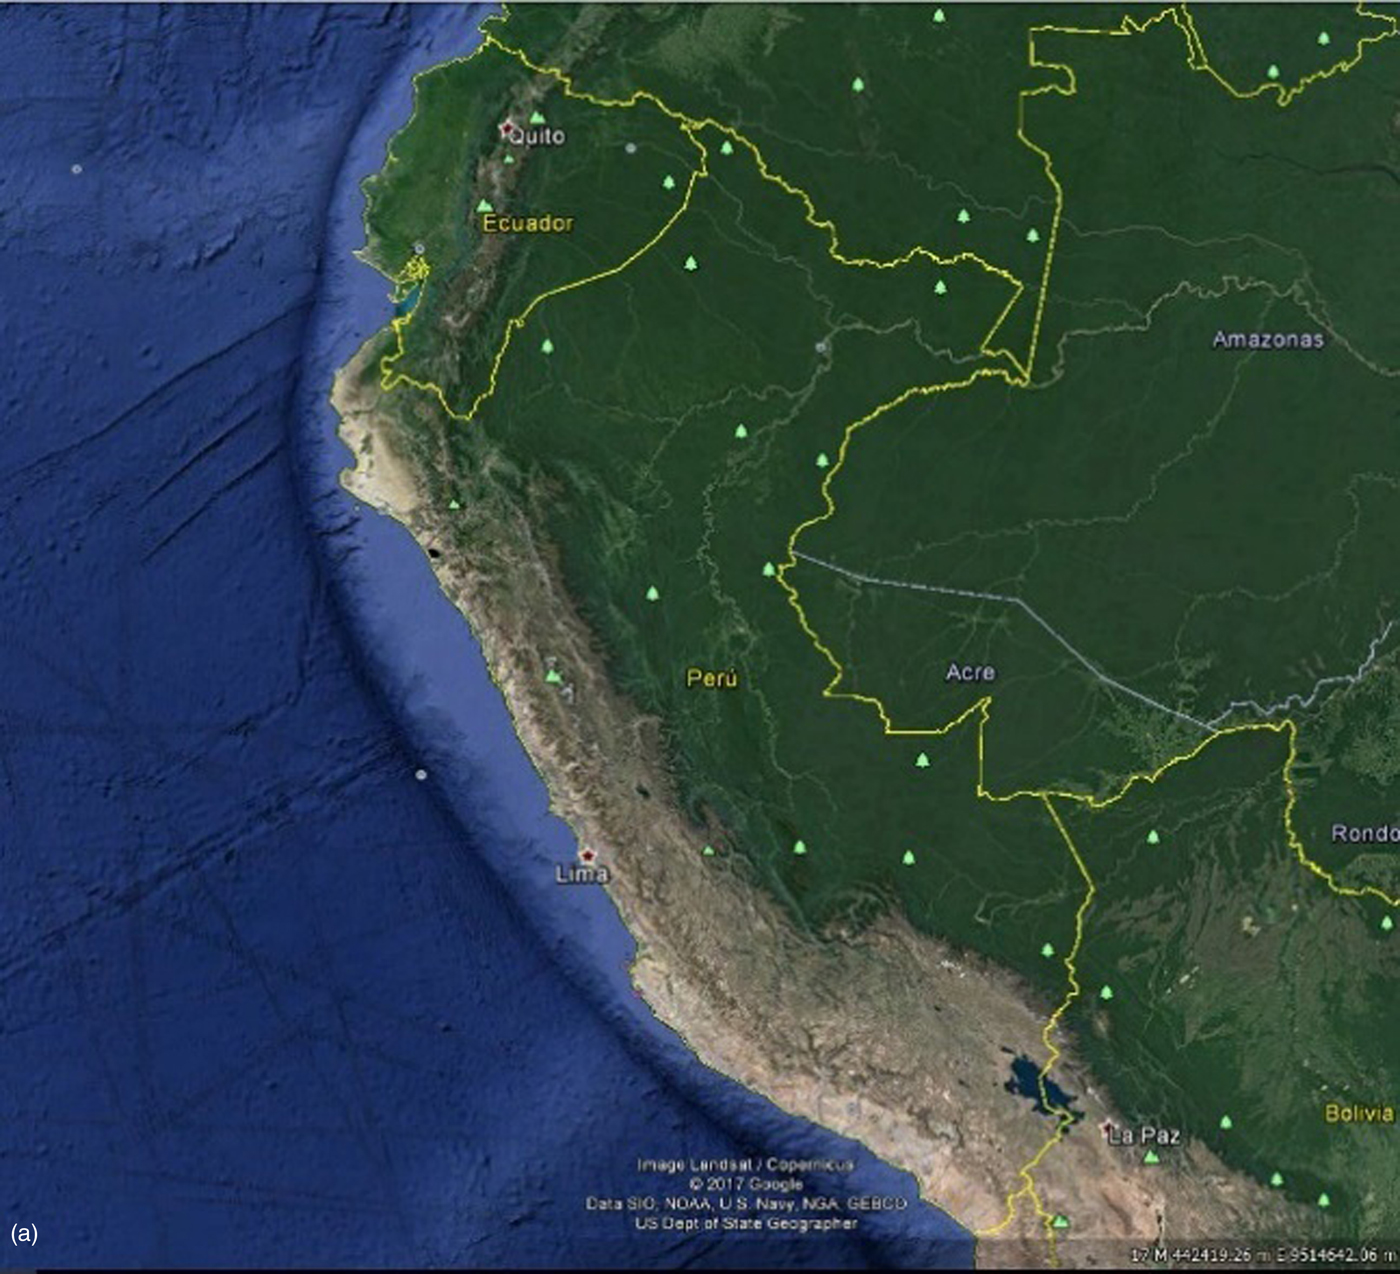
FIGURE 4a. Map of Peru.

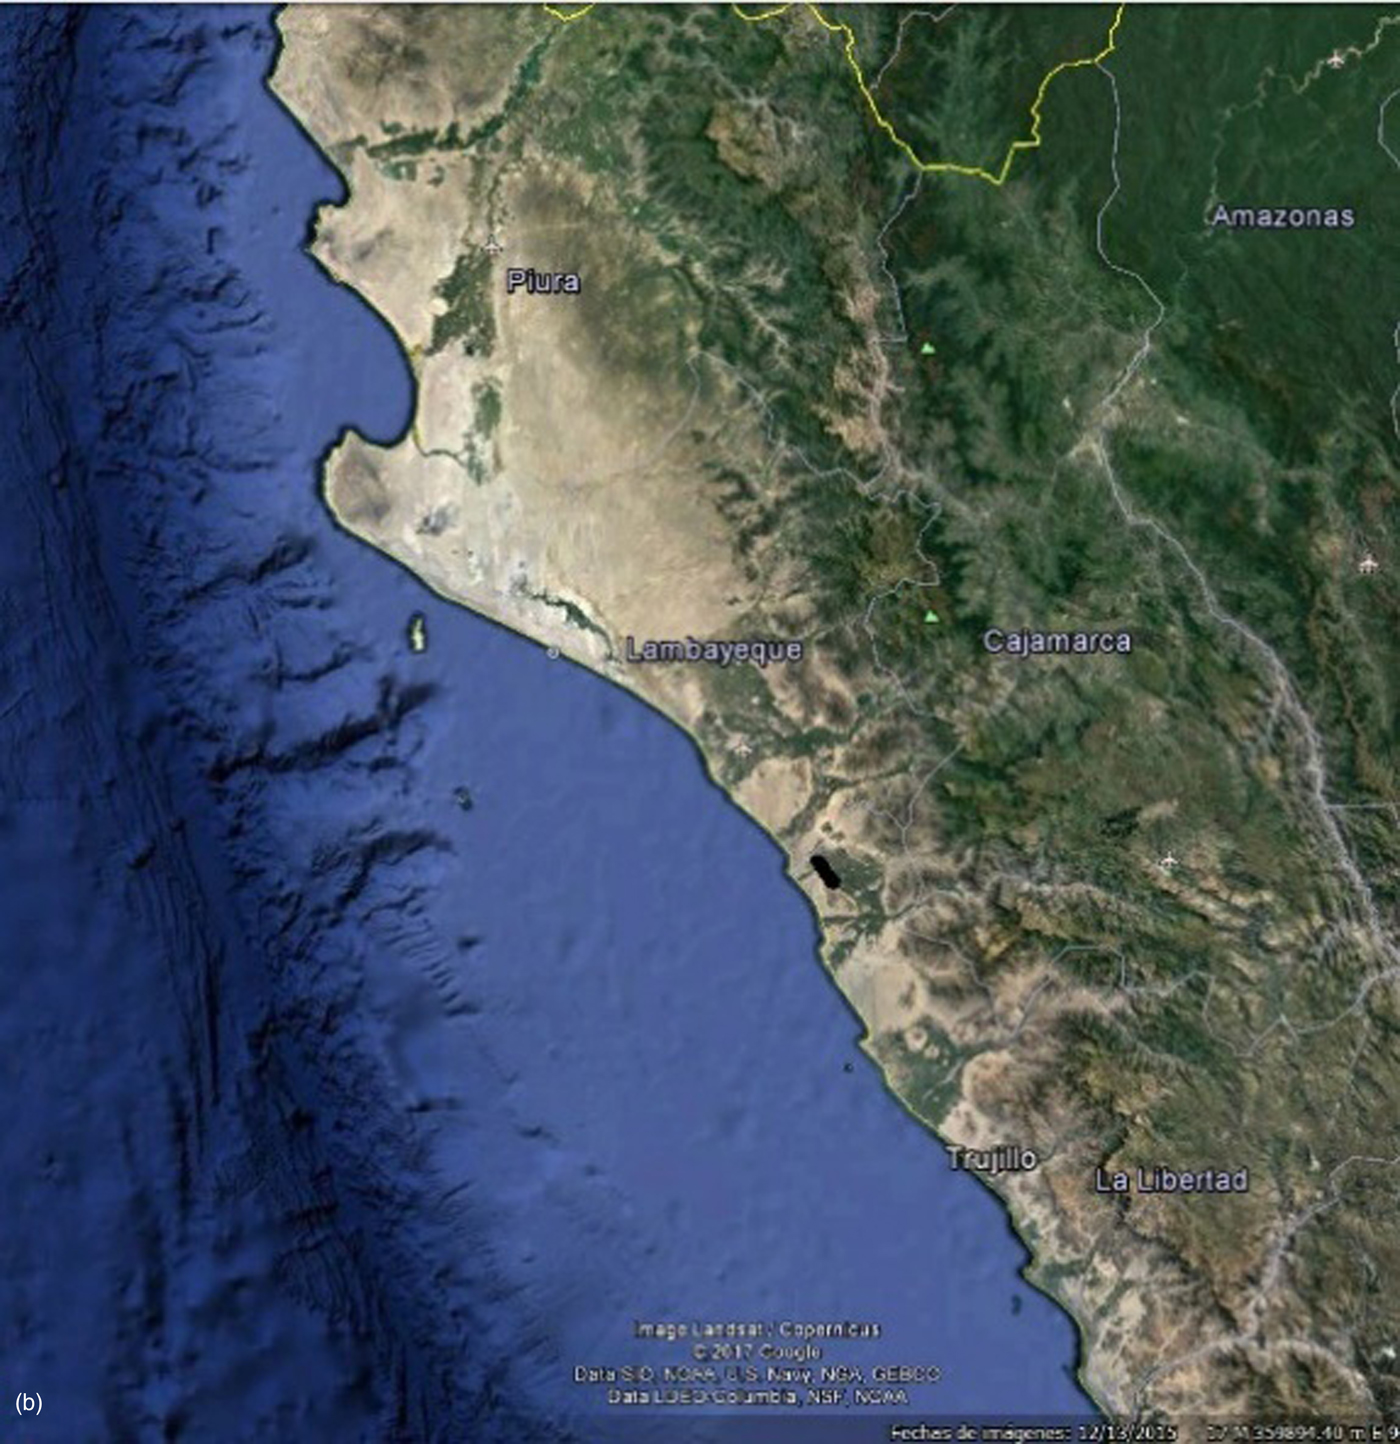
FIGURE 4b. Map of the North Coast Region.

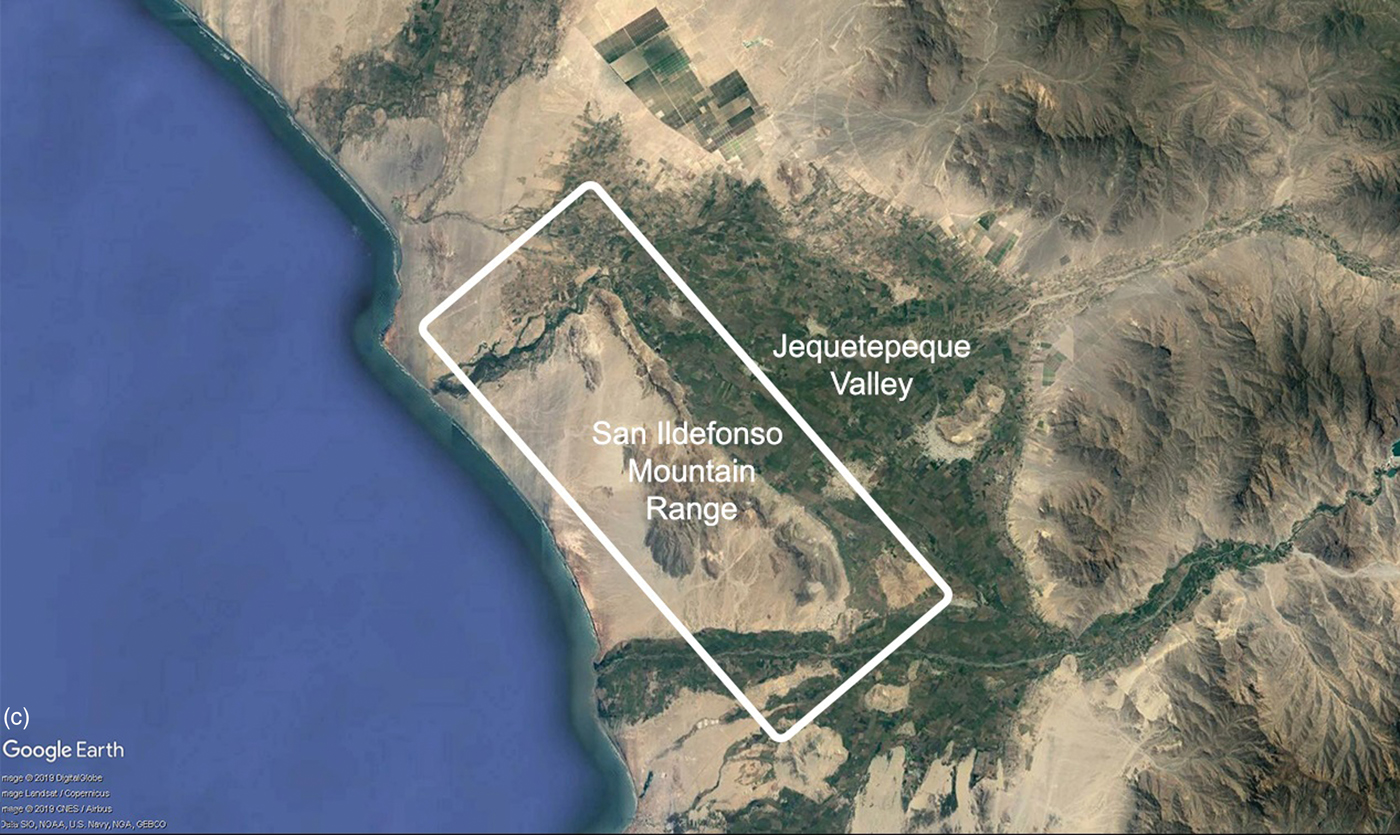
FIGURE 4c. Map of the Jequetepeque Valley, indicating the location of the San Ildefonso Mountains.
THE NEW METHODOLOGY APPLIED IN SAN ILDEFONSO
To face the challenge of flying and recording sites located on mountain slopes in the highlands and on the coast of Peru, such as San Ildefonso,Footnote 2 while at the same time ensuring a uniform and high resolution, we decided to try out a new approach. Rather than a single flight polygon at a single height above the site, the approach that we call “Flying Slopes in Multiple Stepped Polygons” consists of a series of short and ascending rectangular flight polygons flown over the site (see Figure 5). This methodology involved complex preflight preparation and design of flying polygons based on altitudes obtained from Google Earth. The area covered in each flight (polygon) was determined on the basis of visible surface features and comprised a range of altitudes rather than a number of square meters. Once the coverage area was demarcated and a flight polygon was defined, it was exported to DJI Ground Station Pro autopilot, where we could define the perimeter and area, altitude, and photo overlap.
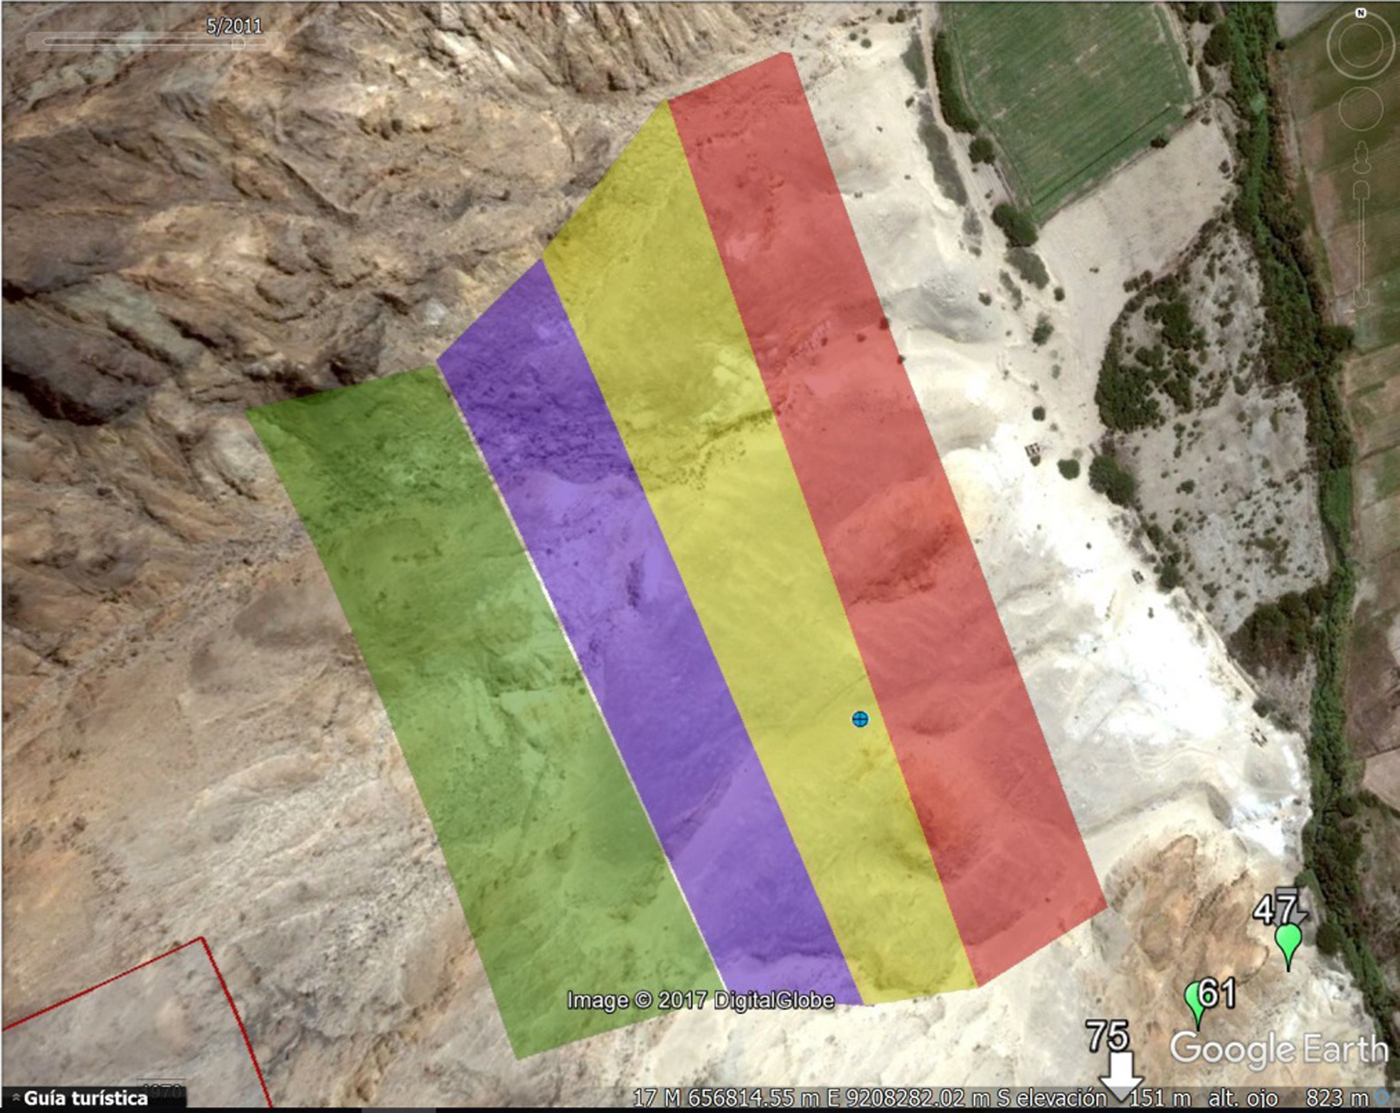
FIGURE 5. Site of San Ildefonso Norte divided into five areas, each representing a different altitude. Each one of these areas was transformed into a flying polygon.
FLYING SLOPES IN MULTIPLE STEPPED RECTANGULAR POLYGONS IN SAN ILDEFONSO NORTE
Our first attempt at this new methodology was conducted over the northern section of San Ildefonso. In the first trials, the key was the shape of the flying polygons, which were rectangular. The resulting flying program was, thus, a series of ascending rectangles, simulating steps over the site, roughly following the slope. The sequence was as follows:
1. Rather than flying the entire site as a single unit, we divided the site into four rectangular sections, designed as polygons in Google Earth and defined by altitude points obtained from this program (Figure 6).
2. Each rectangle roughly represented a portion of the site with altitudes that varied by 20 m (40–60 m, 60–80 m, 80–100 m, and 100–120 m).
3. Each rectangle was exported from Google Earth and imported as a KMZ (Keyhole Markup Zip, one of two formats supported by the program) to the autopilot program DJI Ground Station Pro, where it was transformed into a flight polygon (this requires an in-app purchase). Flight height was set at 30 m above the departing point. Photo overlap was set at 75%. These parameters were the same in all four missions (Figure 7).
4. In the field, we started by climbing to the highest point of the section, where we set the drone departing point or “Home.” From this point we flew the drone at 30 m, so that photos of the section would be between 30 and 50 m above the surface.
5. Before flying each predesigned rectangle with the autopilot, we flew the perimeter of the area by hand at the designed height, particularly the sides that were higher and closer to the mountain. In that way we checked that the most dangerous sections of each polygon were safe to fly with Ground Station Pro.
6. Each one of the rectangles was then flown at a height of 30 m above the highest point in the rectangle.
7. All the photos obtained from the four sections were then processed as a single project using AgiSoft PhotoScan Pro photogrammetry software. 2D orthophotos, 3D DEMs, 3D models, surface models, and digital topography were produced as a result of this process.

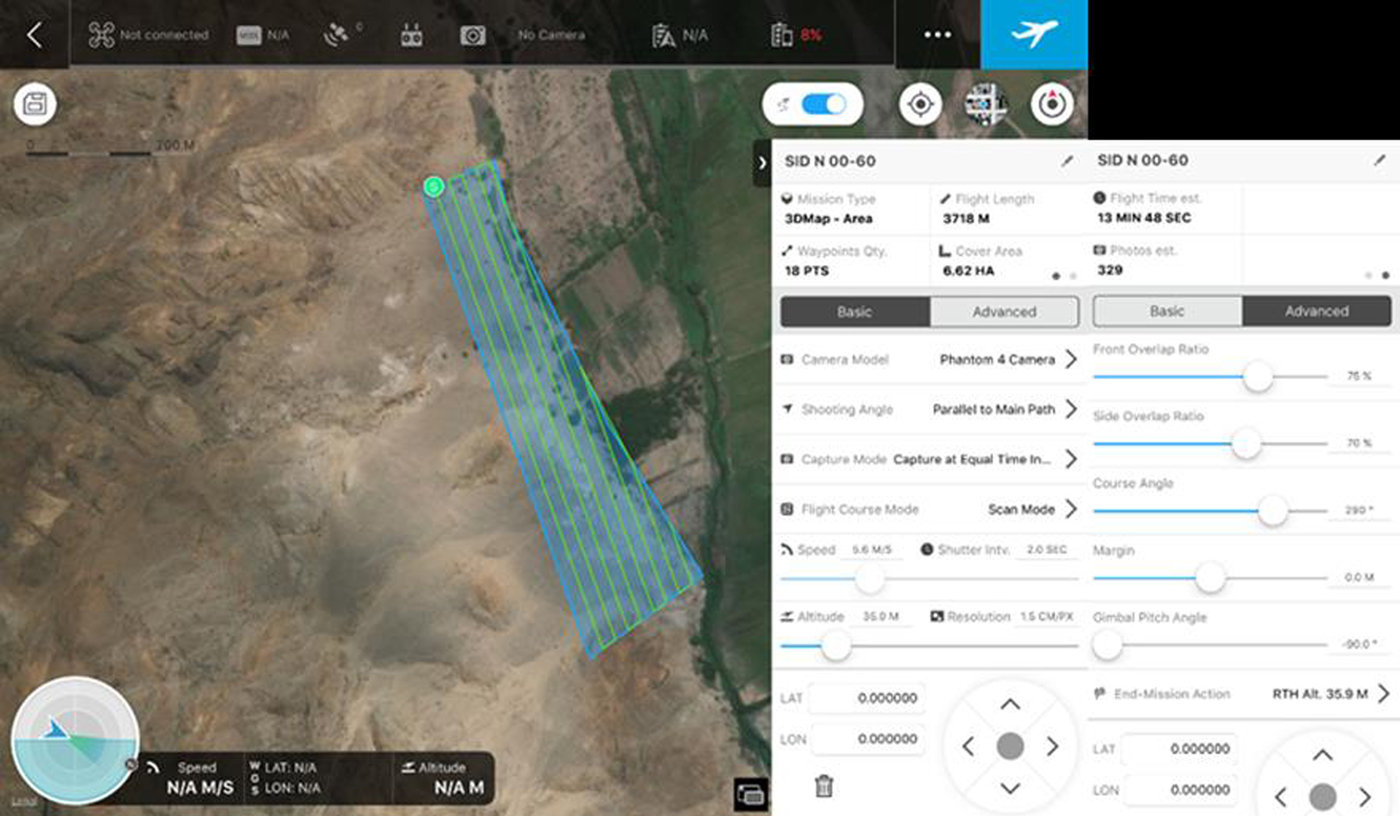
FIGURE 6. DJI Ground Station Pro with all the parameters that are controlled by the program.
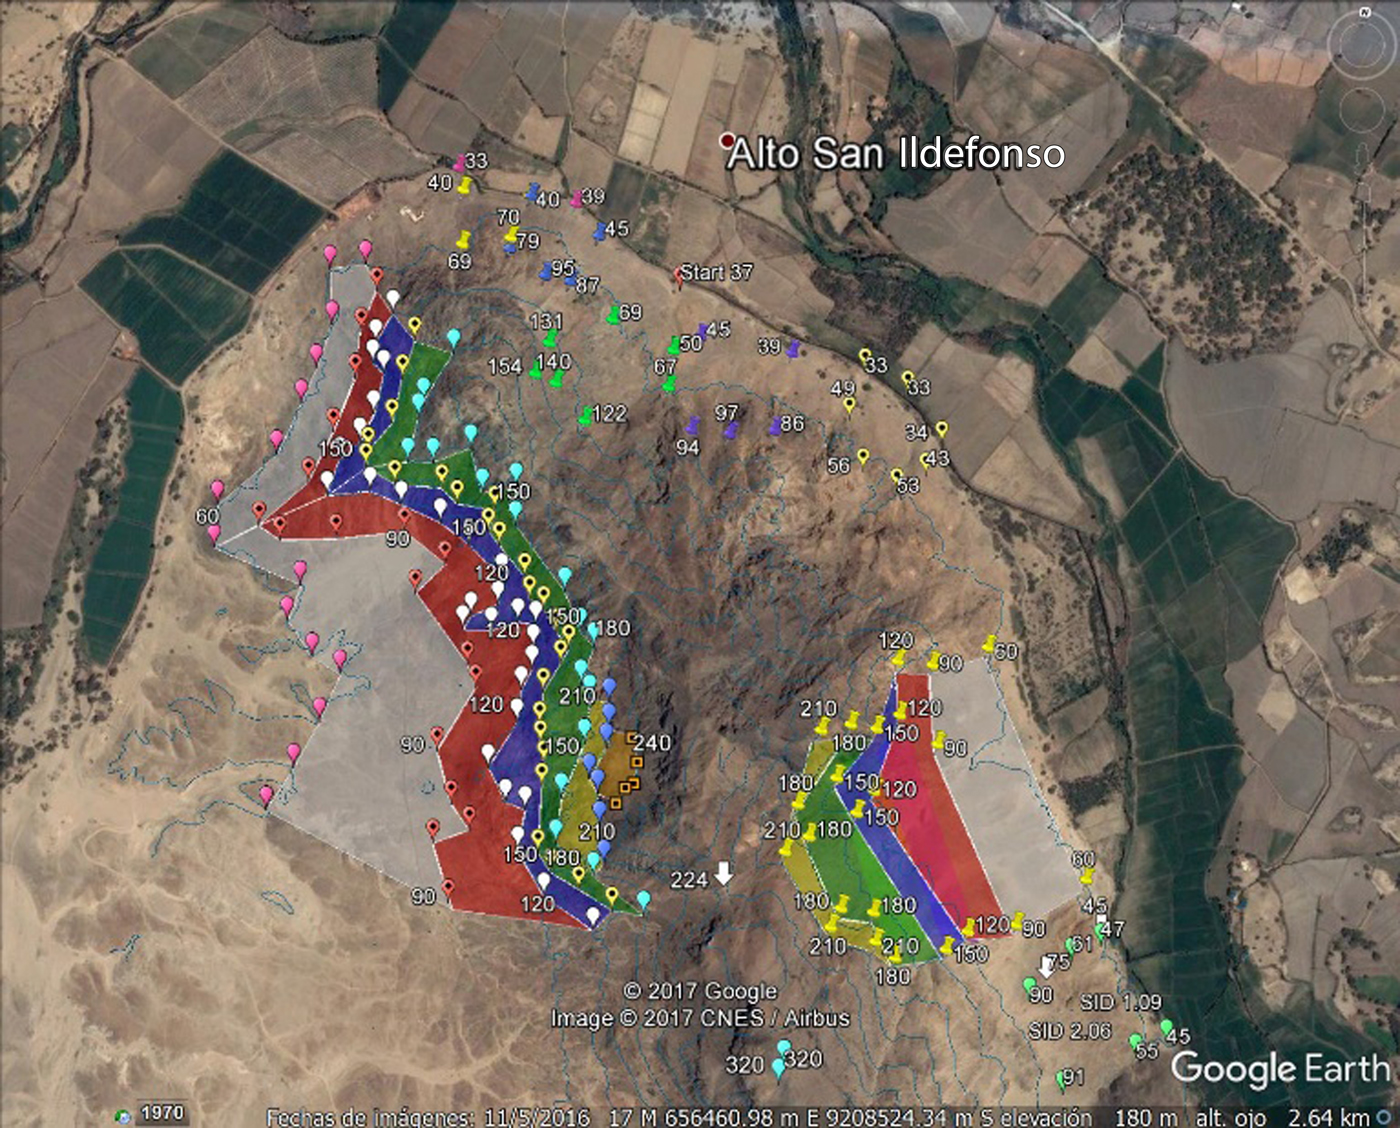
FIGURE 7. Polygons generated from the topography of Cerro San Ildefonso.
Photos taken with this new methodology resulted in 2D and 3D images and models with a much higher resolution than the previous record, where a single height was used.
Nevertheless, the biggest shortcoming of the “Flying Slopes in Multiple Stepped Polygons” methodology, as it was applied in San Ildefonso Norte, was the shape of the polygons. Rectangular polygons clearly did not match the topography of the slope, sometimes going too far from the intended area and other times taking the drone dangerously close to the mountain wall. It was clear that the polygons had to follow the contour of the topography rather than being arbitrary rectangles.
FLYING SLOPES IN MULTIPLE STEPPED POLYGONS ADAPTED TO THE TOPOGRAPHY IN CERRO SAN ILDEFONSO
To record Cerro San Ildefonso, the second of two sites in the northern end of the San Ildefonso Mountain Range, the “Flying Slopes in Multiple Stepped Polygons” methodology was refined to address the biggest flaw of the previous attempt. This time we designed polygons that more closely matched the topography of the mountainside. To design these topographic polygons, we needed accurate topographic information for the mountain slope. Google Earth provides elevation information that can be used as a reference to start the planning process, while still taking into account that there might be sharp errors that require a full field verification (see point B.2 of the next sequence).
Flights over Cerro San Ildefonso were conducted the last week of July 2017, after flying almost 40 other sites in the San Ildefonso Mountains. Because the wind picks up very fast in the early afternoon we could fly only in the mornings. On the basis of the topography provided by Google Earth three areas were defined representing the altitude ranges of 60–90 m, 90–120 m, and 120–150 m. Figure 8 shows the design of the topographic polygons and can be contrasted with the rectangular shape of the polygons used in the previous attempt.
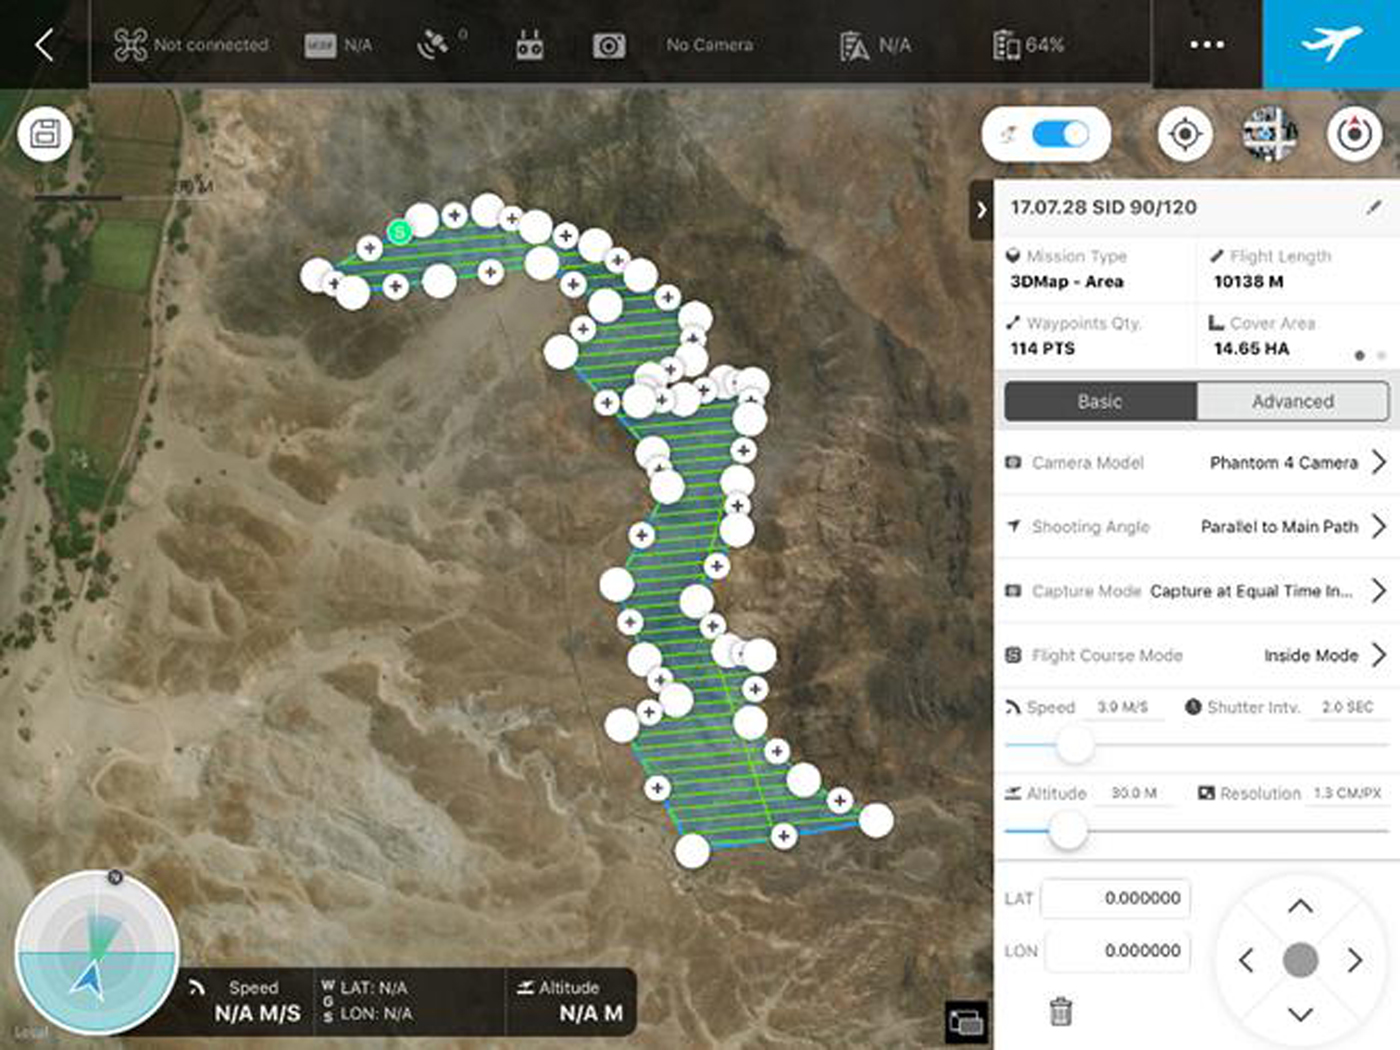
FIGURE 8. Flight polygon in DJI Ground Station Pro for Cerro San Ildefonso's 90–120 m elevation. Due to the specific form of this polygon, we chose to change the orientation of the way points in order to minimize the time it would take to complete the mission.
The refined methodology used at Cerro San Ildefonso, and later in many more projects, followed this sequence:
A. Before the Fieldwork
1. Define the entire flight area, on the basis of the site layout or the portion of the site that will be recorded. The entire flight area should be defined as a single polygon in Google Earth. This polygon should be slightly larger than the area that needs to be documented. When outlining the general area, consider that the drone should preferably fly within a 2 km radius, to prevent problems related to interference or signal loss (this can vary from one model to another).
2. Design, within the general flight area, smaller polygons that represent the altitude ranges that will be covered in each flight. It is a good idea to mark out in Google Earth the topographic lines representing the elevations that will be covered. In the case of Cerro San Ildefonso, key altitudes were 30, 60, 90, and 120 m. Ranges encompassed 30 m of elevation each and thus were 30–60 m, 60–90 m, and 90–120 m. The shape, size, and width of these polygons will depend on the steepness of the terrain. The polygons so designed were irregular, formed by several georeferenced points. Verify that within each smaller polygon there are no elements that exceed in elevation the height of the perimeter.
3. Export the polygons in KMZ to the autopilot that will be used to fly the missions. Exported polygons should be defined by georeferenced points. We use the DJI Ground Station Pro autopilot program, since most of the drones we currently use are DJI Phantom 4 Pros.
4. In DJI Ground Station Pro, create a flight mission for each one of the polygons defining the following parameters (see Figure 5):
a. the mission's name (that should include the site name and the height range);
b. capture mode (best is “equal distance interval” or “equal time interval”);
c. flight altitude (this varies according to the desired resolution; see Table 3);
TABLE 3. Relationship between Height, Objective, and Expected Image Resolution Using a DJI Phantom 4 and Phantom 4 Pro.

d. front and side overlap (no less than 65% each; front overlap determines the number of photos, and side overlap determines the number of transects);
e. course angle (for the smaller polygons following the width of the area, be sure to set the starting point of each mission);
f. end mission action. (It is better to set the drone to “Hover” at the end of each mission and bring it home manually or load and launch the next mission. If it is set to “Return to Home,” make sure that there are no obstacles on the way home.)
B. In the Field
1. Find a flat location where the drone will be lifted and return (“Home”). From this location you should be able to see the drone without any obstructions throughout the missions. The home point can be the same for all the flight polygons making up the mission, or it can change as higher polygons are flown.
2. It is better if the entire mission is flown with the same drone, even when taking oblique photos of selected vertical elements. Two different drones might have slightly different altitude parameters, and cameras might capture photos with different colors. When processing the photos in the photogrammetry software these differences could affect negatively the 2D and 3D products.
3. Run the autopilot as well as the remote control software. Load the mission, turn on the drone, and raise it to the desired height of the mission.
4. It is very important that the perimeter and altitude of each polygon are verified to avoid crashing. To do this verification, in manual control elevate the drone to the flight height and fly the drone following the highest part of the polygon's perimeter, where it gets closest to the mountain/terrain. This verification should be done with caution. As you fly and verify that the perimeter is safe also verify that there are no obstacles within the polygon. If the slopes are very steep, this verification could be dangerous. Prevent crashing and if needed, modify the polygon, so that the drone does not get dangerously close to the mountain's side when flying in autopilot. Save changes.
5. Start the mission. If the mission is too large, you might need to change batteries. This should be done easily, and after the new battery is loaded the drone should return to where it stopped and continue the mission. During the mission make sure that the drone is taking photos at every time interval.
6. If all polygons of a site, independent of their height range, are flown from a single home point, then the photo overlap parameters will need to account for that too, to match the necessary number of photos and transects (way points).
C. After the Field
1. Documenting sites with drones tends to produce large numbers of photos. Keep them organized by type (nadir, oblique, and artistic photos; videos) and mission. Back up and keep at least two copies of the photos.
2. Process the photo collections in photogrammetry software. We use two different programs: DroneDeploy and Agisoft PhotoScan Pro. First, we upload all nadir images to DroneDeploy, a service that processes the images and in a short period of time produces orthophotos, elevation models, a rough 3D model, and plant health images. Second, we process the images with a photogrammetry program (there are many excellent programs). Agisoft PhotoScan Pro allows us to have control over every aspect and step of the processing and also produces great orthophotos, elevation models, 3D models, and digital topographies. PhotoScan can process oblique as well as nadir photos, which is better when modeling vertical aspects of a site or building (see Figures 9 and 10).

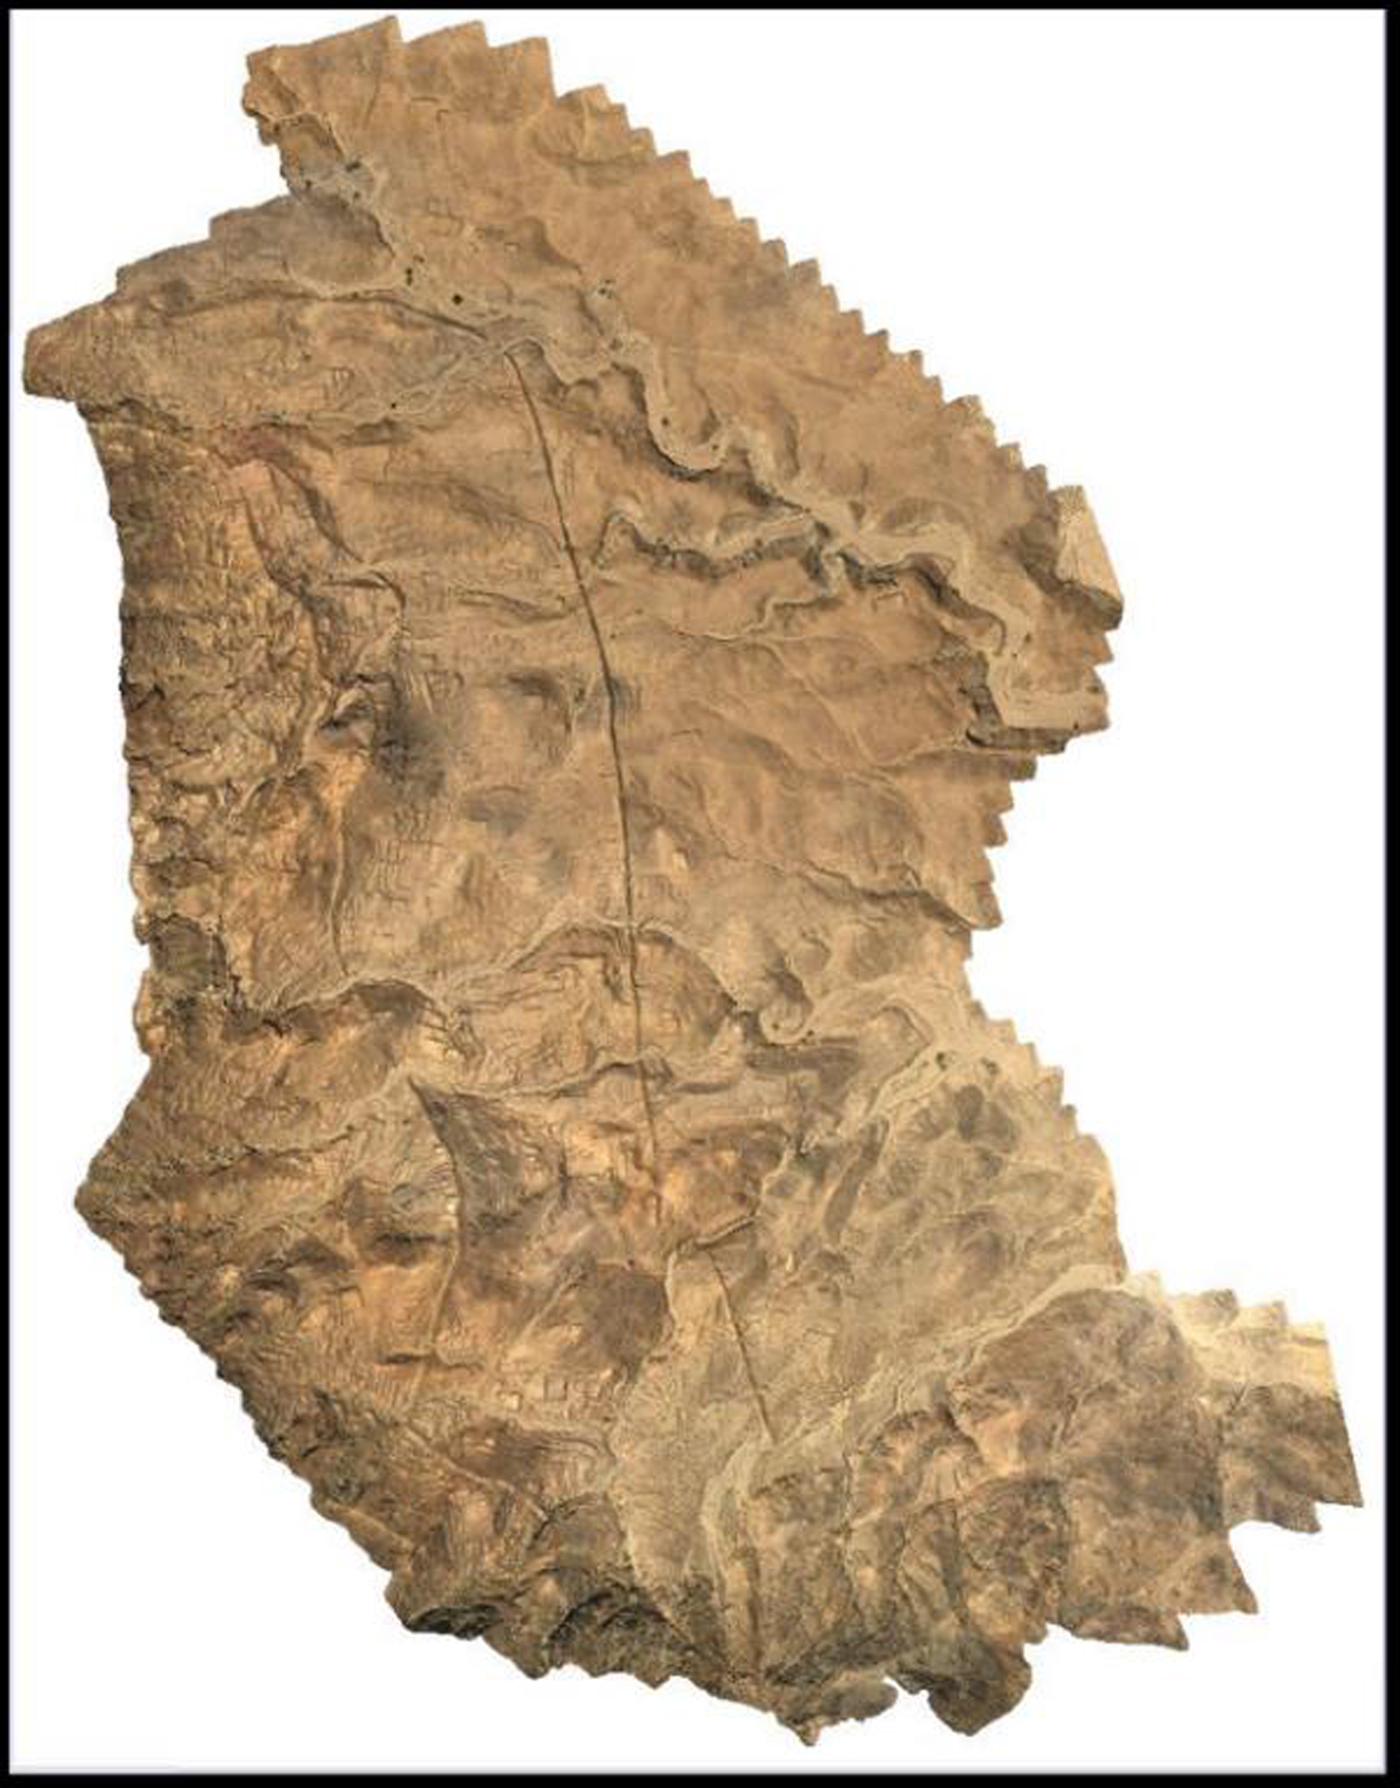
FIGURE 9. Orthophoto of Cerro San Ildefonso with topographic lines.
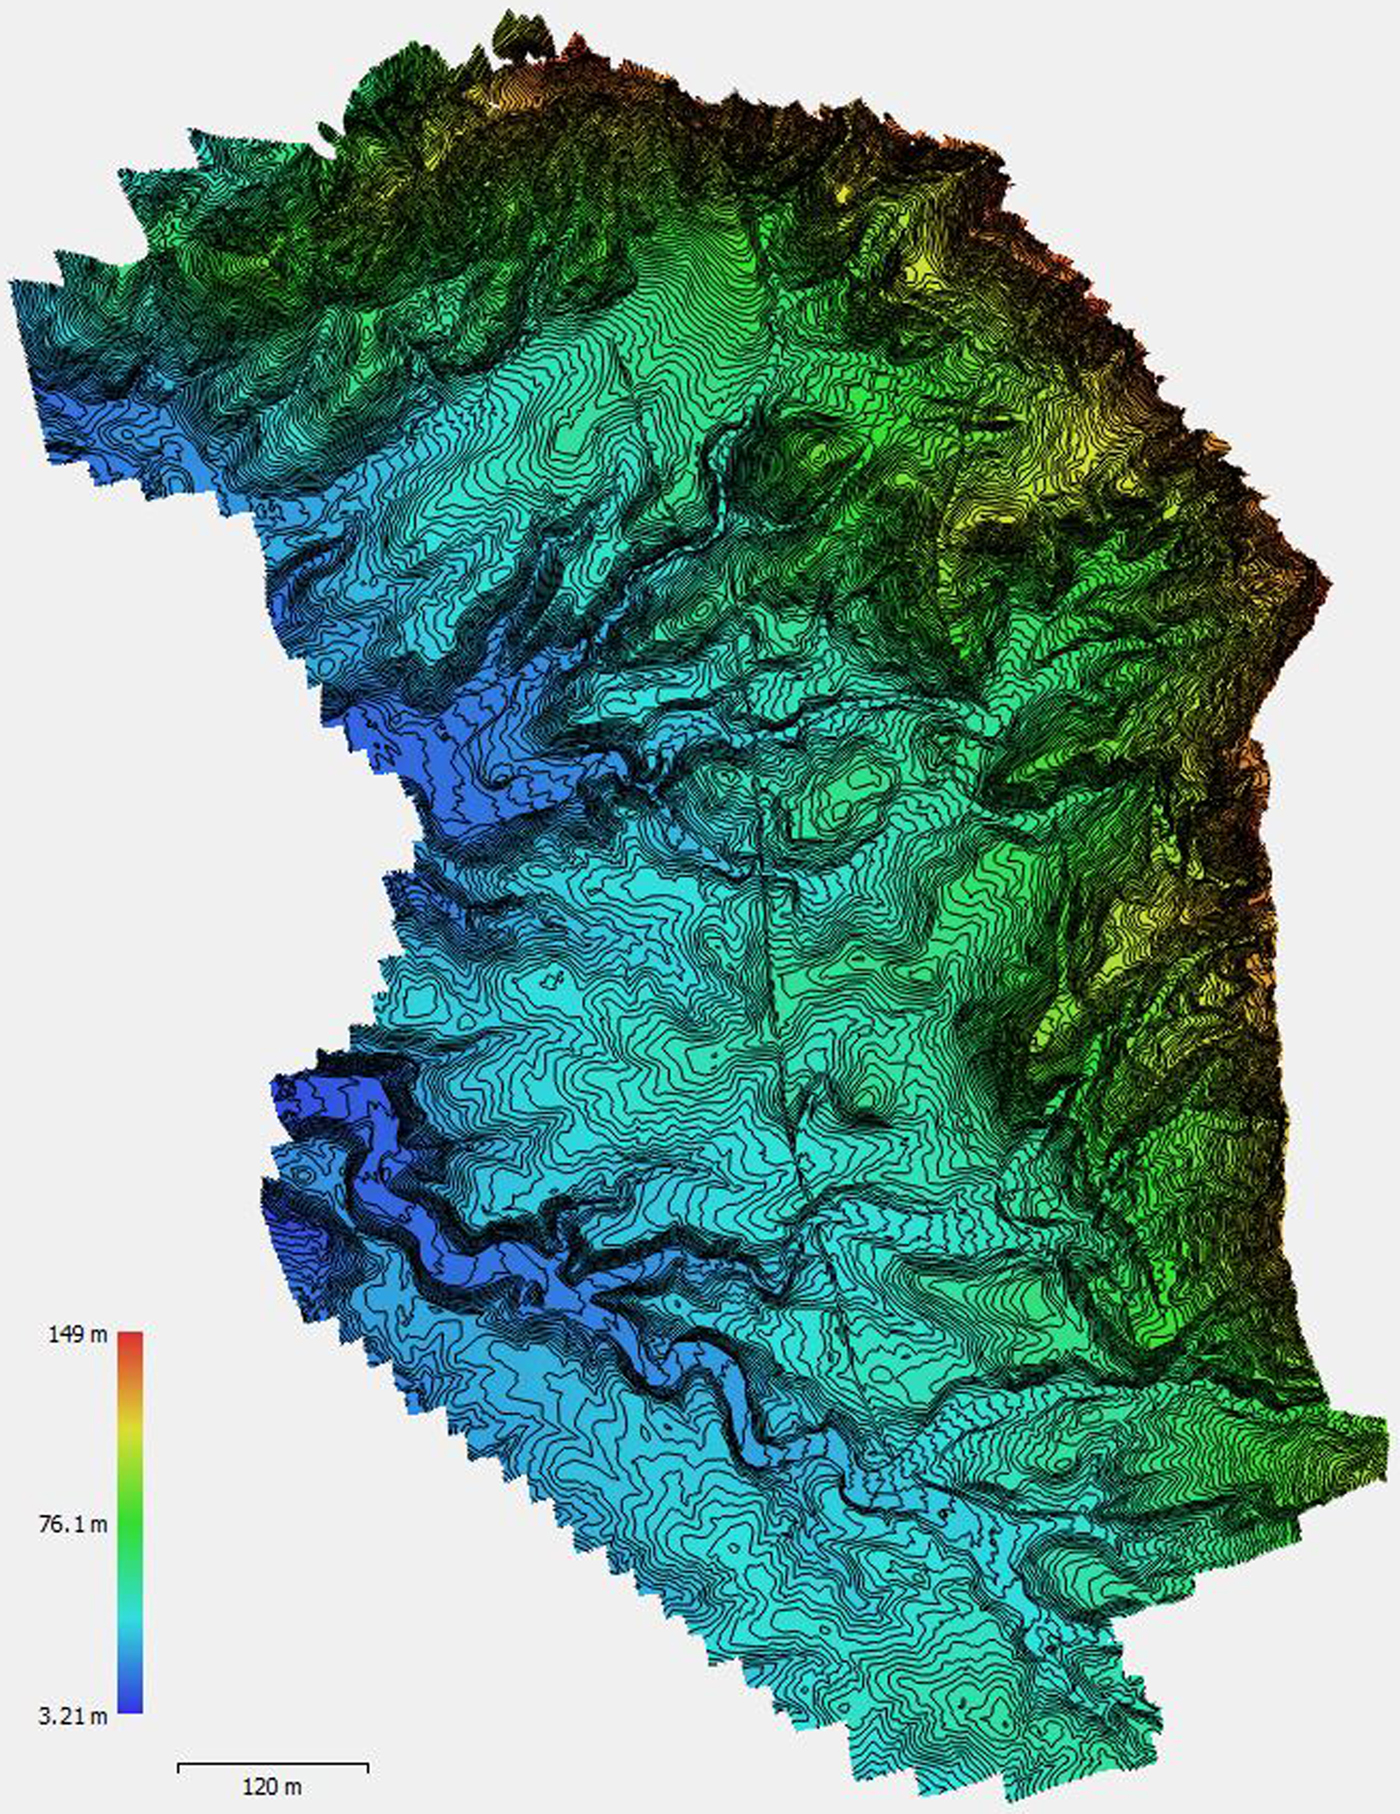
FIGURE 10. Digital elevation model of Cerro San Ildefonso with topographic lines.
The reason behind flying this site with extreme precision was the need to produce high-resolution orthophotos, DEMs, and 3D models. These images and data can be used for a multitude of purposes that range from strictly research to the protection and preservation of the site. An even more important reason to fly the site with this level of accuracy was to “proof the concept” that such a record could be done and to set a standard of quality that could be used in future missions (see Figures 9, 10, and 11).
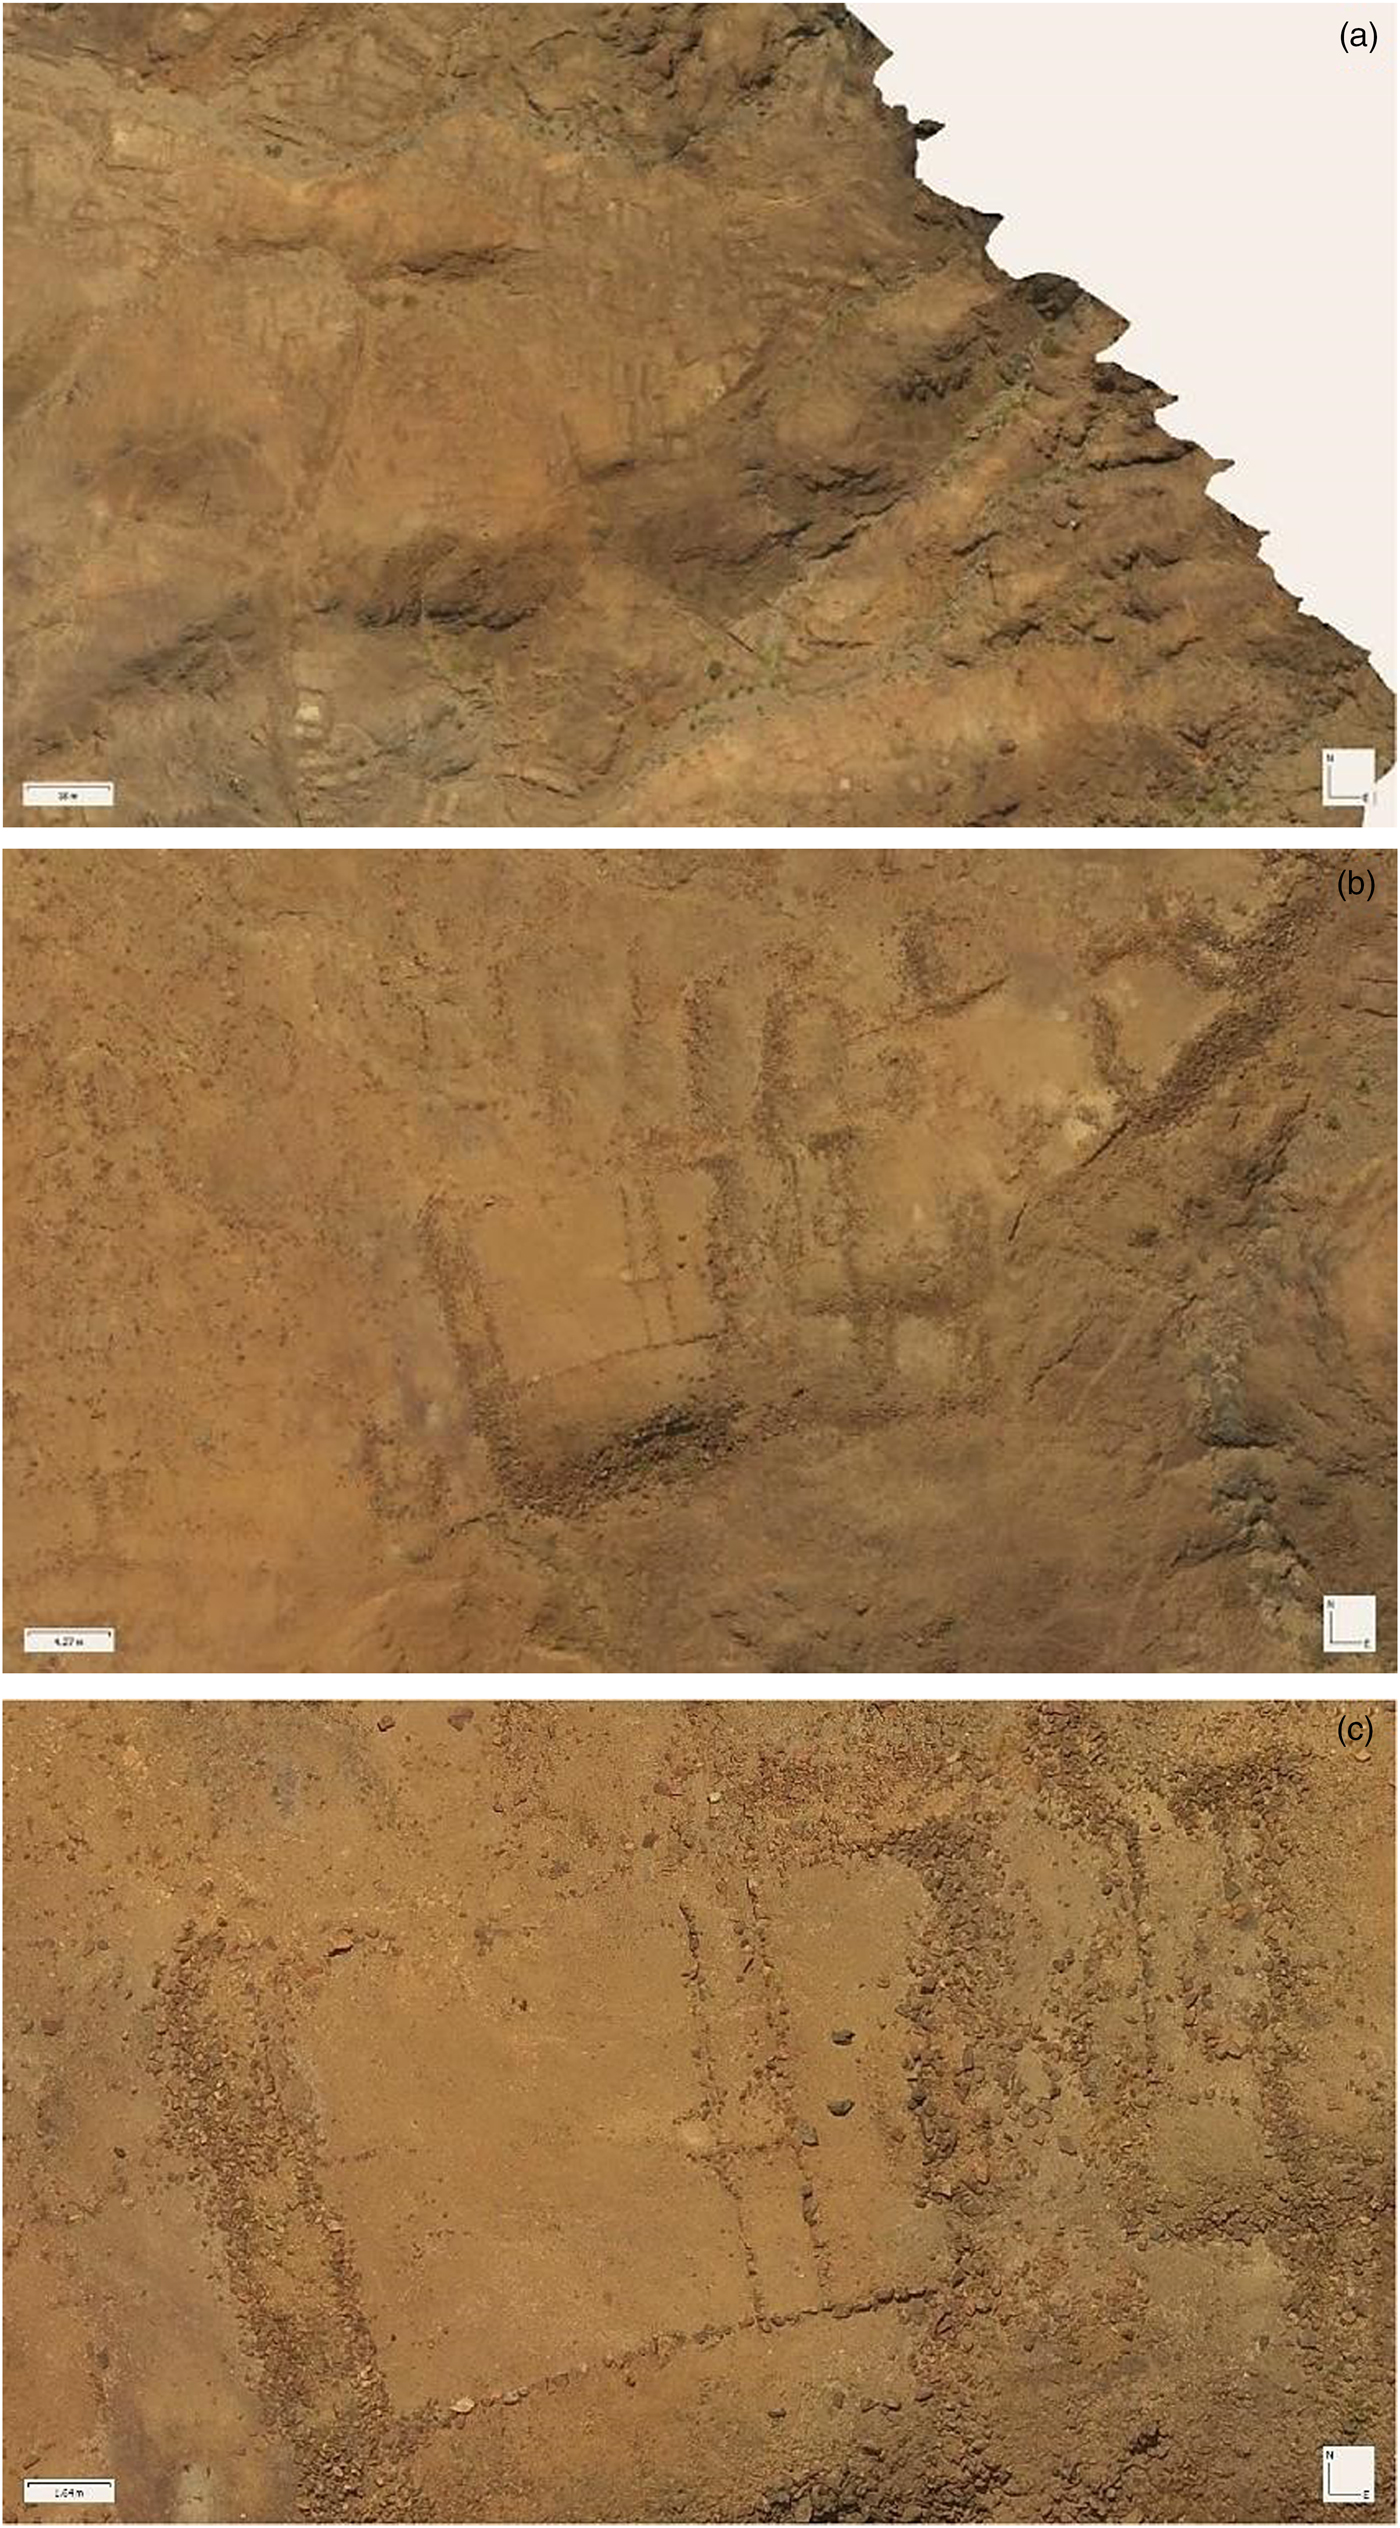
FIGURE 11. (a–c) Selection of images from the Cerro San Ildefonso's orthophoto showing architectural details.
FLYING ALL POLYGONS FROM ONE HOME POINT
One additional complication of the Cerro San Ildefonso recording project was that some sections of the site are almost inaccessible without mountain climbing training and gear. We needed to start each one of the polygons from a fixed point, changing parameters in the autopilot so that we achieved the same quality of images and roughly the same number of images as would have been produced if the flight had started only 30 m above the highest vertices of the polygon. In a way, this meant fooling the autopilot and making it behave as if it had started each mission from the highest point of the polygon. In the rugged conditions of Cerro San Ildefonso, the preflight verification of the perimeter described above was absolutely necessary for safety reasons and also to make the corrections required. It turned out that all points and vertices were correct, but some would have put the drone dangerously close to the rocks.
At the end of the mission we had flown evenly three segments covering the heights of 60–90 m, 90–120 m, and 120–150 m. The relative altitude of all flights was between 30 and 60 m above target. These flights produced 3,481 photos of 14 MP. Processing all these images was a different problem, which involved the use of AgiSoft PhotoScan photogrammetry software and a very well-equipped computer. The added mission covered 47.7 ha, and the total length of flying was 29,000 m. The final products are orthophotos with resolutions of 1.97 cm/pix for the entire site and a DEM of 7.87 cm/pix. The size of the orthophoto file in JPG format is 496 MB and in TIFF is 4,194 MB.
SUMMARY AND CONCLUSIONS
The addition of drones to the scientific toolbox has brought about great new possibilities in almost every field. This has been particularly true for archaeological field research and for the conservation and protection of our built heritage. As drones become more available and effective, the challenge of precision becomes more important. Better georeferencing and higher-resolution outputs are the current thresholds. In order to achieve the second objective, drones have to fly closer to the ground and, ideally, follow the elevation of the surface. This task can be extremely complicated along the steep surfaces and mountains typical to the Andean region where we work. In this article, we have presented a recording (flying and photographing) methodology that achieves a higher resolution by dividing up sites into several altitudinal sections, which are flown independently but processed photogrammetrically as a single set. We have named this methodology “Flying Slopes in Multiple Stepped Polygons.”
The examples used to illustrate the “Flying Slopes in Multiple Stepped Polygons” methodology come from work conducted in several highland and coastal sites in Peru, but mostly from the San Ildefonso Mountains. In this region of the northern coastal valley of Jequetepeque, we have been experimenting with several drones and recording methods since 2013. However, a methodology to produce highly accurate images of several large and complex Late Moche sites had to wait until the latest generation of drones and autopilot was made available. “Flying Slopes in Multiple Stepped Polygons” attempts to reduce the altitude variations between surface and drone throughout the recording mission and, at the same time, create missions that can be exactly replicated in the future. Applying this methodology increased the quality of the images and models produced with them.
The main goal of this project, shared with our GlobalXplorer partners, was to record known, unknown, and endangered archaeological sites in order to protect them from further destruction and contribute to their research and understanding. Thanks to the “Flying Slopes in Multiple Stepped Polygons” methodology, we have been able to record in great detail more than 1,000 sites in Peru. Several new sites have been identified thanks to the detailed resolution of the images produced by drones. Because of the way they fly, how close they can fly over the ground, and the resolution of their cameras, drones can increase the resolution of orthophotos from the 50–70 cm/pix resolution of satellite images to less than 1 cm/pix.
Finally, the kind of documentation described in this article lends itself to a more effective process of monitoring sites and small regions. Once a site has been flown in multiple stepped polygons the flight parameters (area and perimeter, altitude, overlap, orientation, etc.) can be saved and stored, and the mission can be flown again whenever needed, producing comparable results in terms of 2D and 3D images. This new capacity is the basis of a novel way to approach monitoring, since we would get not only visual representations of the state of the site and its components but volumetric information as well. Armed with this technology, authorities and agencies in charge of the safeguarding of built heritage can accomplish their work in a faster and more reliable way. Monitoring with drones is already used by archaeologists to track the progress of their excavations or the evolution of their interventions in sites and monuments. New uses and opportunities will certainly develop as these technologies evolve.
Acknowledgments
This research was conducted with the permission of the Ministerio de Cultura and under the supervision of the Dirección Desconcentrada de Cultura de La Libertad. Fieldwork occurred during the Harvard University Archaeological Field School in San Jose de Moro. Funding for this program was generously provided by Pontificia Universidad Católica del Perú and the National Geographic Society as part of their ground-truthing efforts associated with GlobalXplorer. The Sustainable Preservation Initiative and the Patronato de las Huacas del Valle de Moche offered us their administrative support. We want to thank Larry Coben, Matthew Piscitelli, Sarah Parcak, Gary Urton, Jason Ur, Sabine Girod, the students of Pontificia Universidad Católica del Perú and Harvard, and particularly the late Santiago Uceda for their help.
Data Availability Statement
Original data for this essay are stored in the archives of the Laboratory of the Archaeology Department, Pontificia Universidad Católica del Perú, and are accessible upon request. A web page that will provide easy access to the San Ildefonso data and those of 1,000+ other archaeological sites documented with drones in Peru is under construction.