

Nomenclature
- b
total arc length of the hemispherical portion, m
- c p
pressure coefficient
- c d
drag coefficient
- d
distance from wall boundary of the mesh, m
- D
diameter of the main body, m drag, N
- D 0
drag for base model, N
- k
thermal conductivity, W/m K
- M
Mach number
- l/D
ratio of overall length of the spike to the diameter of the main body
- l
overall length of aerospike, m
- l 1
distance between stagnation points of the rearmost aerodisk and base body, m
- l 2
distance between stagnation points of the second aerodisk and the rearmost aerodisk, m
- l 3
distance between stagnation points of the front aerodisk and the second aerodisk, m
- l’
l 2 +l 3, m
- P, p
pressure, N/m2
- P inf
freestream pressure, N/m2
- q
local surface heat flux, W/m2
- q 0,ns
stagnation point heat flux for the 3 in. hemisphere-cylinder without spike, W/m2
- q 0
wall heat transfer rate of the base body, W/m2
- q 0,peak
peak heat flux for the base model without spike, W/m2
- Q
total heat transfer rate,
 $${\int} {q\,{\rm d}A} $$
, W
$${\int} {q\,{\rm d}A} $$
, W- R
universal gas constant, J/kg K
- r 1
radius of the first aerodisk, m
- r 2
radius of the second aerodisk, m
- r 3
radius of the third aerodisk, m
- r
radial coordinate
- s
distance along the surface of hemisphere measured from stagnation point, m
- t
time, s
- T
temperature, K
- y +
non-dimensional cell wall distance,=
${{{\rm \rho }yu_{T} } \over {{\rm \mu }_{w} }}$
- µ
molecular viscosity kg/ms
- ρ
density, kg/m3
- ν
kinematic viscosity, m2/s
-
$\tilde{v}$
modified turbulent kinematic viscosity, m2/s
- χ
modified turbulent viscosity ratio,
$\tilde{\rm v}\,/\, {\rnu} $
- τ ij
shear stress in j direction acting on a plane perpendicular to i direction, N/m2


Subscripts
- ∞, inf
freestream values
- x, y
component along x-, y-directions
1.0 INTRODUCTION
With a renewed interest in space tourism and commercial high-speed intercontinental transportation system, many scientists and researchers are motivated to investigate newer designs for ensuring economic, safe and reliable means of hypersonic flight. Amidst a variety of design requirements, reduction the aerodynamic heating as well as the aerodynamic drag is a major challenge for the design of hypersonic flight vehicles. For the escape of spacecraft and missiles from the atmosphere, the drag on the body should be reduced, as lowering the aerodynamic drag on these vehicles ensures the desired range and economises the fuel usage. In contrast, during the descent of these vehicles, the aerodynamic heating should be reduced to protect the important payloads and structural integration of the hypersonic vehicles. The thermal protection system requirements impose the use of a blunt nose for all such vehicles, which results in a large drag making manned re-entry highly improbable( Reference Anderson 1 ). The use of different types of active and passive devices has been proposed in the literature for the reduction of aerodynamic heating and drag( Reference Wang, Sun, Huang, Li and Yan 2 ). One such passive device, primarily used for drag reduction at hypersonic speeds, is an Aerospike. An aerospike protruding axisymmetrically from the nose of a blunt body has the potential of reducing the wave drag of such vehicles, but with increased heat loads on main body itself. Alexander( Reference Alexander 3 ) first suggested the use of aerospikes in 1947 at the Langley pilotless aircraft division for the reduction of drag on blunt bodies at supersonic speeds. Subsequently, a large number of investigations were carried out to understand the physics of high-speed flows past a blunt body with protruding aerospike at the tip( Reference Bogdonoff and Vas 4 – Reference Stadler and Neilson 13 ). Most of the investigations conducted for spiked blunt bodies have shown that the use of aerospikes can favourably reduce the wave drag at supersonic and hypersonic speeds for most l/D ratios of aerospike( Reference Crawford 5 , Reference Yamauchi, Fujii and Higashino 11 – Reference Kalimuthu, Mehta and Rathakrishnan 14 ). The effectiveness of the aerospikes in reducing the aerodynamic drag can further be enhanced by using a blunt tip, often hemispherical in shape, and then called as aerodisk( Reference Kalimuthu, Mehta and Rathakrishnan 12 , Reference Kalimuthu, Mehta and Rathakrishnan 14 – Reference Gopalan, Menezes, Reddy, Hashimoto, Sun, Saito and Takayama 18 ). Although it has been established that aerospikes reduce the wave drag, it can detrimentally increase the heat transfer rates to the blunt body. Stadler and Neilson found that the addition of spikes at the nose of a hemispherical blunt body approximately doubles the heat transfer rates to the blunt nose as compared to the blunt nose without spike for l/D ratio of aerospikes between 0.5 and 2( Reference Stadler and Neilson 13 ). Some investigations, however, suggest that the use of aerospikes result in a reduction of heat transfer rates at low Reynolds numbers, if the separated shear layer remains laminar until reattachment( Reference Bogdonoff and Vas 4 , Reference Crawford 5 ). Another perspective on the reattachment heat flux was given by Holden who suggested that the heat transfer rate at the reattachment point is directly proportional to the reattachment angle which is dictated by both the spike length and the cone vertex angle( Reference Holden 8 ). Heubner et al.( Reference Heubner, Mitchell and Boudreaux 19 ) investigated the performance of a flat-faced aerodisk aerospike at a Mach number of 6 and a Reynolds number of 8.0 × 10⁶ and suggested that the aerodisks are effective in reducing both the wave drag and aerodynamic heating at angles of attack up to 5°. Also, in a numerical investigation conducted by Gauer and Paull( Reference Gauer and Paull 20 ), it was observed that the aerospikes with aero-dome configuration could reduce the peak heat flux by up to 85% and was most effective while the pointed aerospike increases the peak heat flux severely. A recent numerical investigation in this aspect of aerospikes was done by Gerdroodbary and Hosseinalipour( Reference Gerdroodbary and Hosseinalipour 21 ) who suggested that the aerospikes with hemispherical tips are the best for the reduction of heat fluxes and aerospikes of l/D ratio of 1, with hemispherical tips is the optimum choice for both heat and drag reduction. All the reductions in heat transfer rates and the reattachment heat fluxes reported in the literature are based on the assumptions of laminar flowfield and are of limited practical use, as they do not represent the hostile aerothermal environment. From the works of Stadler and Neilson( Reference Stadler and Neilson 13 ), Vas( Reference Bogdonoff and Vas 4 ) and Crawford( Reference Crawford 5 ), it is obvious that under turbulent conditions the addition of aerospikes or aerodisks causes and increased heat transfer and increased reattachment heat fluxes to the main body.
Thus, despite having tremendous drag reduction capabilities, aerospikes or aerodisks have not proved to be a worthy device to be of practical use at hypersonic speeds due to detrimental aerodynamic heating associated with it. The use active devices like the counter-flowing jets, which modifies the flow ahead of blunt body in a similar fashion, has been established to reduce both the aerodynamic drag and heat fluxes( Reference Zhang, Huang, Yan, Li, Li and Moradi 22 , Reference Huang, Zhang, Yan, Ou and Moradi 23 ). In fact, the counterflow jets in long penetration mode outperform the aerospikes in drag reductions( Reference Deng, Xie, Qin, Huang, Wang and Chu 24 ). The use of active devices, however, requires an additional mechanism to be carried on board besides the need of an auxiliary power. Some recent investigations have even suggested the combined use of active and passive devices for reductions in both the aerodynamic drag and heat fluxes at hypersonic speeds. These include the combination of forward facing cavity and counter-flow jets( Reference Huang, Jiang, Yan and Liu 25 – Reference Sun, Guo, Huang, Li and Yan 27 ), combination of the acoustic cavity and counter-flow jets and combination of aerospike and counter-flow jets( Reference Eghlima and Mansour 28 – Reference Eghlima, Mansour and Fardipour 31 ). Gerdroodbary et al.( Reference Gerdroodbary, Imani and Ganji 29 ) were the first to suggest the combined use of active and passive devices for reducing the heat transfer rates and peak reattachment heat fluxes for blunt bodies. They reported significant reductions in the aerodynamic heating of a spiked blunt body by adding a counterflow jet along with an aerodisk. An improvement in drag reduction capabilities of the aerodisks was also reported by them. Wei Huang et al.( Reference Sun, Guo, Huang, Li and Yan 27 ) studied a similar concept of aerospike and counter-flow jet combination for drag reduction wherein they reported a maximum reduction of 65% in drag for a jet pressure ratio of 0.4. This reduction, however, has been observed for an impractically long aerospike with l/D=12.5. Most recently, Eghlima et al. have reported a reduction of about 86–90% in drag of a blunt body, using aerospikes along with counterflow jet( Reference Eghlima and Mansour 28 ). They have also reported a reduction in peak heat fluxes of about 66% with the same mechanism for moderate length of aerospikes( Reference Eghlima and Mansour 28 ). These reductions, however, were obtained at a large jet-to-freestream total pressure ratio of 0.8. A survey of various combinations of counter-flowing jets with passive devices for heat and drag reductions can be found in the works of Huang( Reference Huang 32 ).
The use of combinational approach seems to be quite effective; however, the large jet pressure required is the biggest hurdle in the practical implementation of such mechanisms. This high-pressure mechanism, apart from carrying a substantial amount of mass for ejection, would require a compression mechanism on-board. This might totally overweigh the advantage of using such active mechanisms. A more economical passive mechanism for reducing the heat transfer rates and peak reattachment heat transfer rates to blunt body was suggested by Yadav et al.( Reference Yadav and Guven 33 , Reference Yadav, Velidi and Guven 34 ). They numerically investigated the effect of deploying an aerospike with two disks on the peak reattachment heat flux and wave drag for a hemisphere cylinder and found that both the heat transfer rates to the main body and the reattachment heat fluxes were reduced favourably even under fully turbulent flow assumptions. The authors are of the opinion that the use of aerospikes with multiple disks can provide the aerospikes with a better heat reduction capacity without affecting its drag reduction ability. The concept emanates from the fact that replacement of a bow shock with a series of weak conical shock waves reduces the net effects of drag produced by the body and surface heat transfer rates. The use of multiple disks has already proven to have favourable flow stabilising effects at supersonic speeds( Reference Kobayashi, Maru and Fukiba 35 , Reference Maru, Kobayashi, Takeuchi and Sato 36 ). In view of the above state-of-the-art, aerospikes with two and three hemispherical disks aerospikes of varying length, sizes, shapes and relative positions on the spike are investigated for their effectiveness in reducing aerodynamic drag, reattachment heat fluxes and the total heat transfer rates to the blunt body at hypersonic speeds.
2.0 NUMERICAL METHODOLOGY
2.1 Geometric modelling and grid generation
In the present investigation, all the geometries are constructed using a state-of-the-art geometry and mesh generating software Gambit. The base configuration is a hemisphere cylinder with a base diameter 40 mm and the subsequent models have hemispherical disk aerospikes of various lengths and design, protruding from the stagnation point of the hemisphere cylinder as shown in Fig. 1. The diameter of the aerospike stem for configuration is fixed at 0.1D, where D is the diameter of the base body. The overall length of the aerospike l is varied between 1.0D and 2.5D while the radii of the front disk varied between 0.05D and 0.2D.
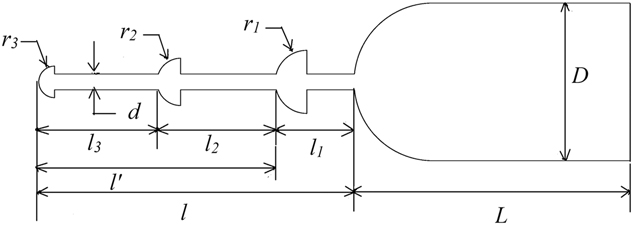
Figure 1 Three-disk spiked configuration.
Three important parameters viz. the l/D ratio, the radii of the aerodisks and the internal position of the intermediate disks on the spike, are identified for their effects on the aerodynamic drag and heat fluxes. The l/D ratio is varied from 1.0 to 2.5 for all the spiked configurations. For two and three-disk aerospikes, the radius of intermediate aerodisk is bigger in size from the upwind aerodisk by an amount of 0.05D (2 mm). The current research elaborates the effectiveness of multiple disk aerospikes, thus for a given l/D ratio and size of the front aerodisks, the intermediate location of the rearward aerodisk can have a significant effect on the flow field ahead of the blunt body. The third parameter of interest investigated in this research is the intermediate positioning of the rearward aerodisk. For the two-disk aerospikes of given l/D ratio, the intermediate disk is placed at either 0.25l, 0.5l or 0.75l with l as the length aerospike. For the three-disk aerospike, for a given position of rear aerodisk, the intermediate disk is positioned at 0.25, 0.5 or 0.75 of the distance between the front and the rear disks, the rear disk position also being varied as with the two-disk case.
The initial mesh generated for the base body has a total cell of 80,000 quadrilaterals with the distance of the first cell from the body is 1e−06 m, such that the non-dimensional wall distance at the body is
 $$y^{{\plus}} \!\simeq1$$
for turbulent computations. Twenty rows structured grid was generated near the wall of the model stretched in the radial direction with a growth factor of 1.2, such that the grid near the wall is dense enough to resolve the viscous stresses. For all the mesh generated outside the prismatic boundary layer, paving techniques have been used to generate all the quadrilateral meshes, which allows varying element size distribution on the boundary as well as the interior region. The paving techniques tend to place well-formed elements along the boundary with irregular nodes in the interior of the geometry. With the addition of the single aerodisk, double aerodisk and triple aerodisk of various geometries, protruding from the stagnation point of the nose of the base bodies, the cell count for subsequent geometry varied from 90,000 to 120,000 in number. These initial meshes were adapted a number of times during the course of solution in the regions of high gradients of pressures and temperature such that the final count of cells reached up to 200,000 in all cases. A typical mesh for a two-disk aerospike configuration is shown in Fig. 2.
$$y^{{\plus}} \!\simeq1$$
for turbulent computations. Twenty rows structured grid was generated near the wall of the model stretched in the radial direction with a growth factor of 1.2, such that the grid near the wall is dense enough to resolve the viscous stresses. For all the mesh generated outside the prismatic boundary layer, paving techniques have been used to generate all the quadrilateral meshes, which allows varying element size distribution on the boundary as well as the interior region. The paving techniques tend to place well-formed elements along the boundary with irregular nodes in the interior of the geometry. With the addition of the single aerodisk, double aerodisk and triple aerodisk of various geometries, protruding from the stagnation point of the nose of the base bodies, the cell count for subsequent geometry varied from 90,000 to 120,000 in number. These initial meshes were adapted a number of times during the course of solution in the regions of high gradients of pressures and temperature such that the final count of cells reached up to 200,000 in all cases. A typical mesh for a two-disk aerospike configuration is shown in Fig. 2.

Figure 2 Hybrid mesh around a spiked blunt body with two hemispherical aerodisks.
2.2 Governing equations and flow solver
The viscous, compressible flows over a spiked blunt at hypersonic Mach numbers are governed by the Navier–Stokes equations. To reduce the computational efforts, the 2D axisymmetric form these equations are solved numerically using the commercially available CFD solver ANSYS FLUENT 16.2. The axisymmetric Navier–Stokes equations applicable to unsteady hypersonic flow is written in strong conservations form as given in the following equation:
 $${{\partial \vec {W}} \over {\partial t}}{\plus}{{\partial \left( {\overrightarrow{{F_{c} }} {\minus}\overrightarrow{{F_{v} }} } \right)} \over {\partial x}}{\plus}{{\partial \left( {\overrightarrow{{G_{c} }} {\minus}\overrightarrow{{G_{v} }} } \right)} \over {\partial y}}{\equals}\vec {S}$$
where
 $\vec {W} $
is the unknown state vector,
$\vec {W} $
is the unknown state vector,
 $\overrightarrow{{F_{c} }} $
and
$\overrightarrow{{F_{c} }} $
and
 $\overrightarrow{{F_{v} }} $
, respectively, are the inviscid and viscous flux vectors along the axial direction,
$\overrightarrow{{F_{v} }} $
, respectively, are the inviscid and viscous flux vectors along the axial direction,
 $\overrightarrow{{G_{c} }} $
and
$\overrightarrow{{G_{c} }} $
and
 $\overrightarrow{{G_{v} }} $
, respectively, are the inviscid and viscous flux vectors along the radial direction and
$\overrightarrow{{G_{v} }} $
, respectively, are the inviscid and viscous flux vectors along the radial direction and
 $\vec {S} $
is the source vector. The system of equations is closed by the perfect gas assumption of the continuum working fluid air.
$\vec {S} $
is the source vector. The system of equations is closed by the perfect gas assumption of the continuum working fluid air.
The variations in molecular viscosity, μ, and the thermal conductivity k of air are computed using Sutherland formula and kinetic theory of gases, respectively. The dependence of specific heat of air, Cp, on temperature is computed using piecewise polynomial approximation. The system of non-linear equations resulting from discretisation of Equation (1) over individual control volumes is solved simultaneously in a coupled manner through a point implicit Gauss–Seidel iterative algorithm in conjunction with the algebraic multigrid method.
2.3 Spatial and temporal discretisation
The spatial discretisation of fluxes over the control volume is done using a second-order upwind scheme. The flux vector splitting scheme used to compute the convective flux at the cell face is AUSM+, which a modified version of the advection upstream splitting method( Reference Liou 37 ). This scheme defines the cell interface Mach number with the neighbouring cell based on characteristic speeds. The inviscid fluxes are defined by the upwind extrapolation of interface Mach number. In this, the flux is split into two separate distinct parts so that they may be suitably upwind stencilled. The flux-function, F( w) can be written as the sum of convective flux F (c) and a pressure flux P as given by Equation (2). AUSM+ gives a very crisp resolution of shock waves as the addition of explicit artificial dissipation is avoided and flux through the cell interface that is calculated using the fourth-order polynomial function of the interface Mach numbers:
 $${\bf F}(w){\equals}{{\bf F}} ^{{(c)}} {\plus}{\bf{P}} $$
where
 $${\bf{F}} ^{{(c)}} {\equals}{\rm M}a\;{\bf \Psi };\,\quad {\bf \Psi }{\equals}\left[ {\matrix{ \rrho \cr {\rrho u} \cr {\rrho H} \cr } } \right]\quad {\rm and}\quad {\bf{P}} {\equals}\left[ {\matrix{ 0 \cr p \cr 0 \cr } } \right]$$
The paper presents the steady-state results, obtained through the time marching solution of the coupled, unsteady Navier–Stokes equations.
2.4 Turbulence modelling
All the simulations are conducted at a freestream Mach number of 6.2 and a unit Reynolds number of 2.64 × 10⁷ per metre. Under these ranges of Reynolds number, the flow can be assumed to be turbulent and a suitable turbulence model needs to be implemented. The two models popularly used for the simulation of hypersonic flows are the one equation Spalart Allmaras (SA) and the two-equation Wilcox k–ω and Menter SST turbulence models(
Reference Roy and Blottner
38
). The SA model was designed specifically for aerospace applications involving wall-bounded flows and has been validated for a wide range of hypersonic flows. For axisymmetric re-entry simulations, the heat flux predictions by the SA model, in the turbulent regions, are superior to those by the Wilcox k–ω and Menter SST models(
Reference Roy and Blottner
39
). Although the SA model underestimates the bubble size in turbulent separation, it correctly predicts the peak pressures and heat transfer rates accurately for hypersonic flows(
Reference Paciorri, Dieudonn, Degrez, Charbonnier and Deconink
40
). In fact, for hypersonic flows involving a laminar separation and turbulent reattachment, an excellent agreement is obtained, in heat fluxes obtained with SA model and the experimental data(
Reference Paciorri, Dieudonn, Degrez, Charbonnier and Deconink
40
). Hypersonic flow over spiked blunt bodies are typical cases of laminar separation and thus the turbulence model implemented in this study is the modified version of the SA model(
Reference Spalart and Allmaras
41
). The SA model incorporates the transport of modified turbulent kinematic viscosity
 $\tilde{v}$
, through the solution of scalar equation (4)(
Reference Spalart and Allmaras
41
):
$\tilde{v}$
, through the solution of scalar equation (4)(
Reference Spalart and Allmaras
41
):
 $${\partial \over {\partial t}}\left( {{\rm \rrho }\tilde{v}} \right){\plus}{\partial \over {\partial x_{i} }}\left( {{\rm \rrho }\tilde{v}u_{i} } \right){\equals}G_{v} {\plus}{1 \over {\rsigma _{{\tilde{v}}} }}\left[ {{\partial \over {\partial x_{j} }}\left\{ {\left( {{\rm \rmu }{\plus}{\rm \rrho }\tilde{v}} \right){{\partial \tilde{v}} \over {x_{j} }}} \right\}{\plus}C_{{b2}} {\rm \rrho }\left( {{{\partial \tilde{v}} \over {\partial x_{j} }}} \right)^{2} } \right]{\minus}Y_{v} {\plus}S_{{\tilde{v}}} $$
In Equation (4), G
v
, and Y
v
represent the production and the destruction of turbulent viscosity while the terms
 $S_{{\tilde{v}}} $
represent the user-defined source. In Equation (4), the production term G
v
, is modelled as
$S_{{\tilde{v}}} $
represent the user-defined source. In Equation (4), the production term G
v
, is modelled as
 $ G_{v} {\equals}C_{{b1}} {\rm \rrho }\tilde{S}\tilde{v}$
, where
$ G_{v} {\equals}C_{{b1}} {\rm \rrho }\tilde{S}\tilde{v}$
, where
 $$\tilde{S}\,\equiv\,S{\plus}{{\tilde{v}} \over {\kappa ^{2} d^{2} }}f_{{v2}} \quad {\rm and}\quad f_{{v2}} {\equals}1{\minus}{\chi \over {1{\plus}\chi f_{{v1}} }}$$
In the modified version of the SA turbulence model, the scalar measure of the deformation tensor S is defined as, S ≡ |Ω
ij
|+C
prod min(0, |S
ij
|−|Ω
ij
|) where
 $C_{{{\rm prod}}} {\equals}2.0, \left| {{\rm \Omega }_{{ij}} } \right|\equiv\sqrt {2{\rm \Omega }_{{ij}} {\rm \Omega }_{{ij}} } $
,
$C_{{{\rm prod}}} {\equals}2.0, \left| {{\rm \Omega }_{{ij}} } \right|\equiv\sqrt {2{\rm \Omega }_{{ij}} {\rm \Omega }_{{ij}} } $
,
 $\left| {S_{{ij}} } \right|\equiv\sqrt {2S_{{ij}} S_{{ij}} } $
(
Reference Dacles-Mariani, Zilliac, Chow and Bradshaw
42
). The mean strain rate S
ij
, in turn is defined as
$\left| {S_{{ij}} } \right|\equiv\sqrt {2S_{{ij}} S_{{ij}} } $
(
Reference Dacles-Mariani, Zilliac, Chow and Bradshaw
42
). The mean strain rate S
ij
, in turn is defined as
 $$S_{{ij}} {\equals}{1 \over 2}\left( {{{\partial u_{j} } \over {\partial x_{i} }}{\plus}{{\partial u_{i} } \over {\partial x_{j} }}} \right)$$
In Equations (4)–(6), C
b1, C
b2,
 ${\rm \rsigma }_{{\tilde{v}}} $
and κ are constants, while χ is the ratio of modified turbulent kinematic viscosity to kinematic viscosity. In turn, the terms f
v1 and f
v2 in Equation (5) are functions of χ.
${\rm \rsigma }_{{\tilde{v}}} $
and κ are constants, while χ is the ratio of modified turbulent kinematic viscosity to kinematic viscosity. In turn, the terms f
v1 and f
v2 in Equation (5) are functions of χ.
The effects of turbulence models on aerodynamic heat and drag predictions of spiked blunt bodies reported recently suggest that SA model provides acceptable results( Reference Huang, Li, Yan and Zhang 43 ). Besides the computational efficiency, the purpose of choosing this model over Menter SST is the insensitiveness of this model towards wall distance, grid resolution and the freestream turbulence intensity( Reference Roy and Blottner 44 ).
2.5 Boundary and initial conditions
Boundaries in all the directions away from the spiked configurations are assumed to be characteristic-based pressure far field wherein the freestream pressure, Mach number and static temperature are specified. The values of primitive variables at the downstream pressure far-field boundary are extrapolated from the interior. The wall of the hemisphere cylinder and the spikes are modelled as no-slip viscous surface with u=v=0, with additional isothermal boundary condition implemented on it. In order to simulate the three-dimensional effects at zero degrees angle-of-attack, the line of symmetry has been assigned an axis type boundary condition across which the flowfield gradients are zero. The values of primitive variables at the far-field boundary conditions, and shown in Table 1, are also used to initialise the solution.
Table 1 Freestream and initial conditions

2.6 Grid independence and solver validation
A grid independence study has been carried out for an arbitrarily selected three-disk aerospike. The peak reattachment pressure seems to vary, as the grid is refined from the starting mesh, which has approximately 65,000 cells. As the number of cells is increased beyond 90,200 cells, the drag coefficient does not change. The peak heat fluxes and the total heat transfer rates, however, cease to change only for grids with element number more than 126,384 as shown in Table 2. Hence, the solution is assumed grid independent for cell count of 126,384 and beyond. Nevertheless, all computations have done with a starting mesh of minimum approximate cell count between 90,000 and 120,000 and going up to 200,000 after adaptive refinement.
Table 2 Grid independence study

Although FLUENT is a state of the art solver, a solver validation study has been conducted for the numerical approach used in this study. The model considered for the validation against experimental data is a 38.4 mm diameter hemisphere-cylinder with a sharp tip aerospike of l/D=1 in a hypersonic stream of Reynolds number 1.2 × 10⁶ and a Mach number of 6.82( Reference Crawford 5 ).
The computed surface heat fluxes are normalised by the stagnation point heat flux of the hemisphere with no spike, at a Reynolds number of 1.03 × 10⁶. The values obtained by the solution of axisymmetric Navier–Stokes equations show a strong agreement with the experimental values as can be seen in Fig. 3. Despite some discrepancy can be seen at the spike hemisphere junction, the peak reattachment heat flux is captured well but probably ahead of the point reported in the literature. The normalised heat fluxes at different radial locations on the surface differ from the experimental values by less than 10% and thus it can be assumed that the solver and numerical approach used to provide reasonably accurate results that can be relied upon.

Figure 3 Solver validation against experimental data of a spiked blunt body by Crawford( Reference Crawford 5 ).
3.0 RESULTS AND DISCUSSION
3.1 Effect of single-disk aerospike
The flowfield around a hemisphere-cylinder with an aerospike or a single aerodisk is well understood( Reference Kalimuthu, Mehta and Rathakrishnan 14 – Reference Gopalan, Menezes, Reddy, Hashimoto, Sun, Saito and Takayama 18 ). The results for single aerodisks are presented here to highlight the effect disk radius. The 2 mm aerodisk is just a blunt aerospike while 4 mm is an aerodisk which causes a stronger detached shock wave resulting in high stagnation pressure and larger region of recirculating flow behind the disk. The flow detached from the aerodisk reattaches on the main body and causes the formation of a reattachment shock wave and hence a peak reattachment pressure. The peak reattachment pressure on the main body, for the bigger aerodisk, is significantly lower than that for 2 mm aerospike hence a reduced drag. A reduced reattachment pressure on the main body results in reduced drag for configurations with larger aerodisks. For single-disk spiked configurations, the highest reductions in drag are obtained with 6 mm disks which offer reductions of about 60% at l/D=1 to 67% at an l/D=2.5, the longest aerospike investigated. For a given l/D ratio, as the radius of the disk is increased from 2 mm to 6 mm, a decrease in drag is observed for hemispherical aerodisks. For 8 mm aerodisk, however, the trend is not the same. For hemispherical aerodisk, the curvature of the bow shock is smooth and with increasing radii of the aerodisk, the vortical flow region increases in size laterally, reducing the wave-drag. At a radius of 8 mm, the wave drag on the disk itself accounts for a major portion of the overall drag because of a large stagnation area of the front aerodisk. This results in an increase in the drag of the whole configuration as the large drag on the aerodisk surpasses the reduction obtained on the main body.
As the radius of the disk is increased for a given l/D ratio of aerospike, the high enthalpy flow is deflected farther away from the main body and a relatively low-temperature flow recirculates in front of the main body. At the point of reattachment of the shear layer on the main body, a reattachment shock wave is formed causing an increase in the temperature and the local heat flux. For the same radius of aerodisk, as the length of the spike increases, the bow shock is pushed away from the main body and a decrease in heat flux is observed. Although the temperature in the shear layer at the reattachment is severe, most of the kinetic energy is dissipated as heat near the front stagnation region and significant amount heat energy is transferred to the disk and spike length. With an increasing length of the aerospike, fluid in the recirculating zone becomes cooler and cooler resulting in reduced overall heat transfer rates to the main body.
3.2 Flow field around blunt body with two-disk aerospikes
The use of two disks modifies the flowfield significantly by adding an extra recirculating region of fluid between the two aerodisks( Reference Yadav and Guven 33 , Reference Yadav, Velidi and Guven 34 ). The vortices formed in front of the main body and in front of the intermediate aerodisk help in reducing the drag by creating suction in the forward direction. Although a small vortex is formed behind each of the disks, the sizes of these vortices are small and overall effect is a reduced drag. The flow between the aerodisks behaves like that for flow over cavities. When the rear disk is placed at 0.25l, the flow is that for an open cavity and a single dominating vortex is seen between the rear aerodisk and the main body. As the rear aerodisk is moved forward, the extent of the vortical flow increases and becomes more longitudinally aligned. With the forward movement of the rear aerodisk, the size of the vortex in front of the rear aerodisk also increases, resulting greater suction in forward direction. Thus, the movement of the rear aerodisk in forward direction results in a decrease of drag of the body. The suction phenomenon is amplified for larger radii of aerodisks, as the region of vortical flow ahead of the rear aerodisk is strengthened with increasing disk radii. When the rear aerodisk is moved to 0.75l, the single vortex in front of the main body splits into two smaller vortices. For longer aerospikes, the presence of twin vortices can be seen for even 0.5l positions of the rear disk.
3.3 Effect of double disk aerospike on aerodynamic drag
For two-disk spiked blunt bodies, two major regions of recirculating flow help in the reduction of pressure drag. The reattachment pressure and skin friction on the rear aerodisk add to the drag, but the overall effect is a reduction in drag as can be seen in Fig. 4. The bar charts, shown in Fig. 4, present the aerodynamic drag of double disk for l/D ratios of 1.0, 1.5, 2.0 and 2.5 for varying radii.

Figure 4 (Colour online) Normalised drags for spiked blunt body with two hemispherical aerodisks.
More than 35% reduction in drag is observed in all cases of spiked blunt bodies, as compared to the base body. As the overall l/D ratio of these aerospikes is increased, a gradual reduction in the drag of the blunt body is observed, with the longest aerospike investigated giving the lowest drag. As the rear aerodisk is moved forwards for a given length of aerospike, a reduction in drag is observed. Moving the rear disk forward makes the recirculating flow region between the rear aerodisk and the main body grows larger, which in turn reduces the drag further. With the increasing radius of the aerodisks, a substantial reduction in drag is observed. For the double disk aerospikes, a reduction in drag of up to 74% is observed for l/D ratio of 2.5 and aerodisk radii of r 1=6 mm and r 2=4 mm. For the largest aerodisks investigated, the reduction trend continues for l/D ratio of 1.5. The increase in drag observed for single 8 mm aerodisk is not seen for the double aerodisk configuration with r 1=8 mm and r 2=6 mm, as the comparatively smaller front aerodisk weakens the shock wave for the rear larger aerodisk. The reductions in drag for various aerodisk configurations are highly affected by the peak reattachment pressure on the shoulder of the main body. A higher reattachment pressure is generally associated with a higher wave drag.
The configurations with rear aerodisk close to the main body have a relatively large reattachment pressure. Consequently, the double disk aerospikes with l 1/l =0.25 offers no improvement in drag reduction over single-disk aerospikes. However, for all other configurations, the peak reattachment pressure for double disk aerospikes is lesser than that for single-disk aerospike with same radii of the front disk. The result is a reduced drag for double disk aerospikes as compared to single-disk aerospikes. The peak reattachment pressure on the shoulder of the main body reduces by a greater amount as the overall length of the aerospike is increased or as the rear aerodisk is moved forward for the same overall length of the aerospike. The reductions in drag follow the trends followed by the peak reattachment pressure.
3.4 Effect of double disk aerospikes on heat transfer rates
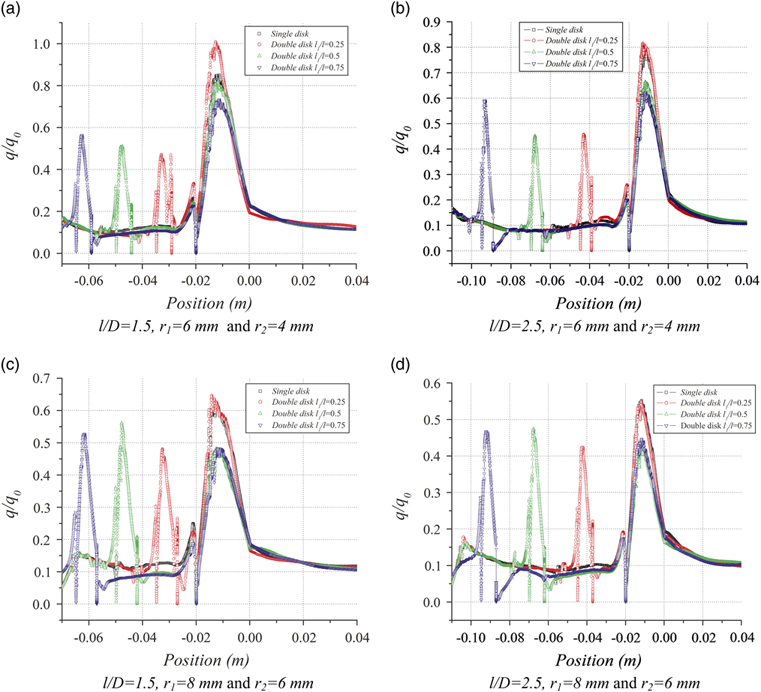
For two-disk aerospikes, a considerable amount of kinetic energy is dissipated as heat and thus the local heat fluxes for two-disk aerospike is generally lower than that for the base configuration. For the configurations with r 1=4 mm and r 2=2 mm, which virtually means no front aerodisk, the reattachment heat flux is about 81% higher than that of the base configurations, for an l/D ratio of 1.0 and l 1/l=0.25. As the rear aerodisk is moved forward or as the overall l/D is increased, the peak heating is decreased, but for no cases with r 1=4 mm and r 2=2 mm, any reduction in peak heating is observed. As can be seen in Fig. 5, a reduction of up to 27% seen at l/D=1.5, in the case of configuration with r 1=6 mm and r 2=4 mm is increased by up to 40% at an l/D ratio of 2.5. For the configurations with r 1=8 mm and r 2=6 mm, reductions of about 35–52% is observed at an l/D of 1.5 and reductions of about 45–55% in heat fluxes is observed for an l/D of 2.5. The forward movement of rear aerodisk for a given overall length also improves the reduction in peak heat transfer rates. The double disk configurations with the rear disk at 25% of the length of aerospike give the highest local heating rates for all lengths and radii of aerodisks. As compared to a single-disk aerospikes, the double disk aerospike configuration gives a lowered peak reattachment heat fluxes, except for the cases with rear disk located at 0.25 of the overall length of the spike. As can be seen in Fig. 5(c), with the same radii of the front aerodisk, the double disk aerospike offers about a 27% reduction in peak heat fluxes at l/D of 1.5 with the rear disk at 75% of the total length of spike, whereas the single-disk aerospike offers only 10% reduction. The advantage in reduction of peak reattachment heat flux is observed clearly with the used of double disk aerospikes.

Figure 5 (Colour online) Surface heat flux distributions for the two-disk spiked blunt body.
The reductions in peak reattachment heat fluxes also impact the total heat transfer rates to the main body. Although a fair amount of heat is transferred to the aerodisks, the post-compression shock wave temperatures result in large heat transfer rate to the main body. Despite the large reattachment heat fluxes, the longer aerospikes show considerable reductions in total heat transfer rates. As can be seen in Fig. 6, for small l/D ratios, the two-disk aerospikes can result in up to 29% increase in total heat transfer rates for r 1=4 mm and r 2=2 mm. However, with an increase in disk radii, quite favourable reductions in total heat transfer rates were observed. For configurations with r 1=6 mm and r 2=4 mm, reduction of about 8% for l 1/l=0.25 at an l/D=2.5 were observed. As the rear aerodisk is moved forward on the spike, further reduction total heat transfer rates can be observed. For a configuration with r 1=6 mm and r 2=4 mm, the reductions in heat transfer rates increase up to 19% at an l/D ratio of 2.5 for l 1 /l=0.75, as can be seen in Fig. 6(b). For the configurations with r 1=6 mm and r 2=8 mm, reductions between 15% and 35% in total heat transfer rates were observed.

Figure 6 (Colour online) Total heat transfer rates on main body for two-disk aerospike for various disk radii.
A clear trend in reduction of total heat transfer rates can be observed, with respect to an increase in disk radii or overall l/D ratio of aerospike. As the l/D ratio of the two-disk aerospike is increased, a gradual reduction in total heat transfer rates to the main body is observed. The reductions are further augmented by the forward position of the rear dominating aerodisk, thereby the configurations with the largest l/D ratio and forward most position of the rear disk giving the largest reduction in total heat transfer rates. Also for a given l/D ratio and the intermediate position of the rear disk, the size of the disk controls the reduction in total heat transfer rates. The variations in local heat fluxes and total heat transfer rates depend highly on the interactions between the shock waves and the shear layers emanating from the front aerodisk with those from the rear aerodisk.
The local heat fluxes and the total heat transfer rates to the main body are primarily due to the temperature field near the blunt body. As can be seen in Fig. 7(a), for a small l/D ratio, with l 1 /l=0.25, the shear layer detaches well ahead of the rear aerodisk and the angle of shear layer is such that it strikes directly on the shoulder of the main body, without dissipating much of heat to the rear disk. This results in larger heat fluxes to the main body and hence a large heat transfer rate. As the rear aerodisk is moved forward, the point of detachment of the shear layer also moves forward on the spike. The detached shock layer hits the shoulder of the rear aerodisk dissipating a considerable amount of heat to the rear aerodisk. This results in a reduced reattachment heat fluxes on the main body and a consequently lowered total heat transfer rates. As the l/D ratio is increased, for a given l 1 /l ratio, so does the position of the rear disk from the base body. This pushes the detachment point of the shear layer forward resulting in a reduction heat fluxes to the main body as can be seen in Fig. 7(c). For aerospikes with l/D=2.5, however, the rear aerodisk is relatively at a large distance from the base and the detached shear layer reattaches on the spike aft of the rear disk dissipating some heat to the spike. The shear layer detaches again from the spike stem and hits the main body with slightly larger heat fluxes. Thus, the reduction in heat fluxes with the movement of rear aerodisk for longer aerospikes is not as significant as for shorter aerospikes. Nevertheless, for r 1=6 mm and r 2=4 mm, the configuration with l/D =2.5 and l 1 /l gives the highest reduction in heat fluxes.

Figure 7 (Colour online) Temperature contours for two-disk aerospike with disk radii r 1=6 mm, r 2=4 mm.
As the radii of aerodisks are increased to a combination of r 1=8 mm and r 2=6 mm, the shear layer is pushed further away from the main body. Because of a large rear disk radius, the detached shear layer hits the rear disk dissipating a considerable amount of heat even for configurations with l 1 /l=0.25. With the forward movement of rear disk, the detachment point moves forward on the spike. For an l/D=1.5, and l 1 /l=0.75, the shear layer detached from the front aerodisk does not reattach on any point on the spike stem, dissipating a large amount of heat to the rear aerodisk. This gives a large reduction in heat fluxes to the main body. As the length of aerospike is increased, the location of shear layer detachment moves forward on the spike for smaller values of l 1 /l. For very long aerospikes, with rear aerodisk moved to a very forward position, the shear layer reattaches just aft of the rear disk to detach before attaching again on the shoulder of the main body. This slightly reduces the magnitude of additional heat flux reduction. Thus, for double hemispherical aerodisk with r 1=8 mm and r 2=6 mm, added reduction in heat fluxes with forward movement of rear aerodisk ceases beyond l 1 /l=0.5. For this set of disk radii, the configuration with l/D=2.5 and l 1 /l=0.5 gives the maximum reduction in heat fluxes as the detachment point of shear layer on the spike is the farthest from the main body, ahead of the rear aerodisk.
3.5 Flowfield around three-disk aerospikes
The additional aerodisk in three-disk aerospikes adds another region of recirculation ahead of the blunt body as can be seen in Fig. 8. The shape, the size and the extent of these recirculating flow regions depend upon the overall l/D ratio of the aerospike, the internal positions of the intermediate aerodisks and the sizes of the individual aerodisks. For a very small l/D ratio of the aerospike, the presence of three aerodisks means smaller gaps between the disks and thus single dominant vortices can be seen behind each of the aerodisks for all intermediate positions of these disks. Due to the large radius of the rearmost aerodisk, i.e. r 1=8 mm, only one dominant vortex is formed between the rearmost disk and the main body, for all overall l/D values other than 2.5, despite the movement of this disk to l 1 /l=0.5 and 0.75. The vortex, however, becomes elongated long the spike as the rearmost aerodisk is moved forward on the spike.

Figure 8 (Colour online) Contours of velocity for configurations with three aerodisks.
For an l/D ratio of 2.5 and the highest l 1 /l of 0.75, this elongated vortex breaks up into two smaller vortices. For l/D of 2 and 2.5, and for positions of disks such that l 1 /l =0.25 and l 2 /l’=0.75, there is a large gap between the rearmost disk and the middle disk. For these configurations, the single dominating vortex breaks up into two smaller vortices. Owing to the small size of the front aerodisk, there are two vortices in the region behind it, for most of the configurations, unless the middle aerodisk is too close to the front aerodisk. As can be seen in Fig. 8, there is a single small vortex behind the front aerodisk for smaller l/D ratio while two small vortices are present for l/D values of 2.5. Figure 8 also shows a single dominating vortex between the middle and the rear aerodisks and the rear aerodisk and the main body for all l/D ratios with l 1 /l=0.5.
3.6 Effect of three-disk aerospikes on aerodynamic drag
Although the presence of multiple aerodisks reduces the reattachment pressure on the main body, high pressure on aerodisk contributes to the overall drag of the configuration. Thus, the drag of spiked blunt body with three aerodisks depends on the l/D ratio, position of the mid disk and the sizes of the aerodisks in a coupled manner. The aerodynamic drag obtained for three-disk aerospikes, normalised by the drag of base configuration without any aerospike, is shown in Fig. 9. As can be seen in Fig. 9, as the l/D ratio is increased, there is a gradual and substantial reduction in aerodynamic drag. This is because of the fact that as the l/D increases, the bow shock is pushed away from the main body and the extent of recirculating flow ahead of the main body increases. This reduces the peak reattachment pressure on the shoulder of the main body and low pressure in the stagnation region reducing the drag. For three-disk aerospikes, reduction in drag is also observed as the intermediate disk is moved forward, for a fixed position of the rear disk. Owing to the fact that the intermediate disk is larger than the front disk, as the intermediate disk is moved forward, it comes closer to the shock wave, resulting in relatively higher pressure on the disk itself, but a reduced pressure behind in the wake and on the rear aerodisk as well as on the main body. The result is, thus, reduced reattachment pressure on the shoulder of the main body as can be seen in Fig. 10. As can be seen in Fig. 10, other than the case where l 1 /l=0.25, the peak reattachment pressure is substantially lower than for the single-disk configuration of same front disk radius.

Figure 9 (Colour online) Normalised drag for configurations with three aerodisks configurations.

Figure 10 (Colour online) Surface pressure distribution for selected three-disk configurations.
The effect of reduced reattachment pressure is to reduce the drag whereas the increased pressure on aerodisks increases the drag only slightly because of the small surface of the aerodisks as compared to the main body. However, for the triple aerodisk configuration with l 1 /l=0.75 and l/D=2.5, although the peak reattachment pressure is highly reduced, the large pressure rise on the aerodisks neutralises the reduction in drag as compared to l/D=2.0, as can be seen in Fig. 10(a). Nevertheless, reductions in drag of up to 63% are realised for an l/D of 2.5 and l 1 /l=0.75 for triple aerodisk configuration with r 1=6 mm, r 2=4 mm and r 3=2 mm. Even for three-disk aerospikes, an increase in l/D ratio adds the reductions in drag, with the longest aerospikes of l/D=2.5 giving a reduction of about 75% in drag. The decrease in drag with the forward movement of the mid disk is, however, not as significant as it is for the three disks of smaller size. This is the consequence of high pressures experienced by the mid and the rear aerodisks at l 2 /l’=0.75 as can be seen in Fig. 10(c)–(f). For an l 1 /l=0.25, as the l 2 /l’ is increased from 0.25 to 0.5, there is a slight increase in the pressure on the aerodisks; however, the reattachment pressure on main body is reduced. This gives an overall reduction in aerodynamic drag. But as the l 2 /l’ is further increased to 0.75, there is large jump in pressure on the mid aerodisk with only small reduction reattachment pressure, resulting in marginal increase in drag as compared to configuration with l 2 /l’=0.5. For these configurations, the peak pressure on mid disk is more than 50% of the peak reattachment pressure on the base configuration. For l 1 /l=0.5 and 0.75, the rear aerodisk is at a considerable distance from the main body and owing to its larger radius, the drag of the configuration is solely affected by the rearmost aerodisk. The effect of the movement of mid disk does affect the flowfield around the main body slightly but the drag remains largely unchanged as can be seen in Fig. 9(e) and (f).
This fact is emphasised as we see the surface pressure distribution in Fig. 10(e) and (f), which clearly shows similar pressures on the mid aerodisk for all l 2 /l’ values. In fact, the configuration with l 1 /l=0.5 and l 2 /l’=0.5 has slightly higher pressure on the mid aerodisk and lower pressures on larger rear disk giving a slightly lower drag as compared to other two l 2 /l’ values at l 1 /l=0.5.
3.7 Effect of three-disk aerospikes on heat transfer rates
The local surface heat fluxes are highly affected by the presence of multiple aerodisks in front of the main body. Figure 11 shows the normalised local surface heat fluxes to the spiked blunt body configurations with three aerodisks of radii r 1=6 mm, r 2=4 mm and r 3=2 mm. As with all spiked configurations, there is a severe heating due to the attachment of shear layer on the shoulders of the blunt body with three disks as well.
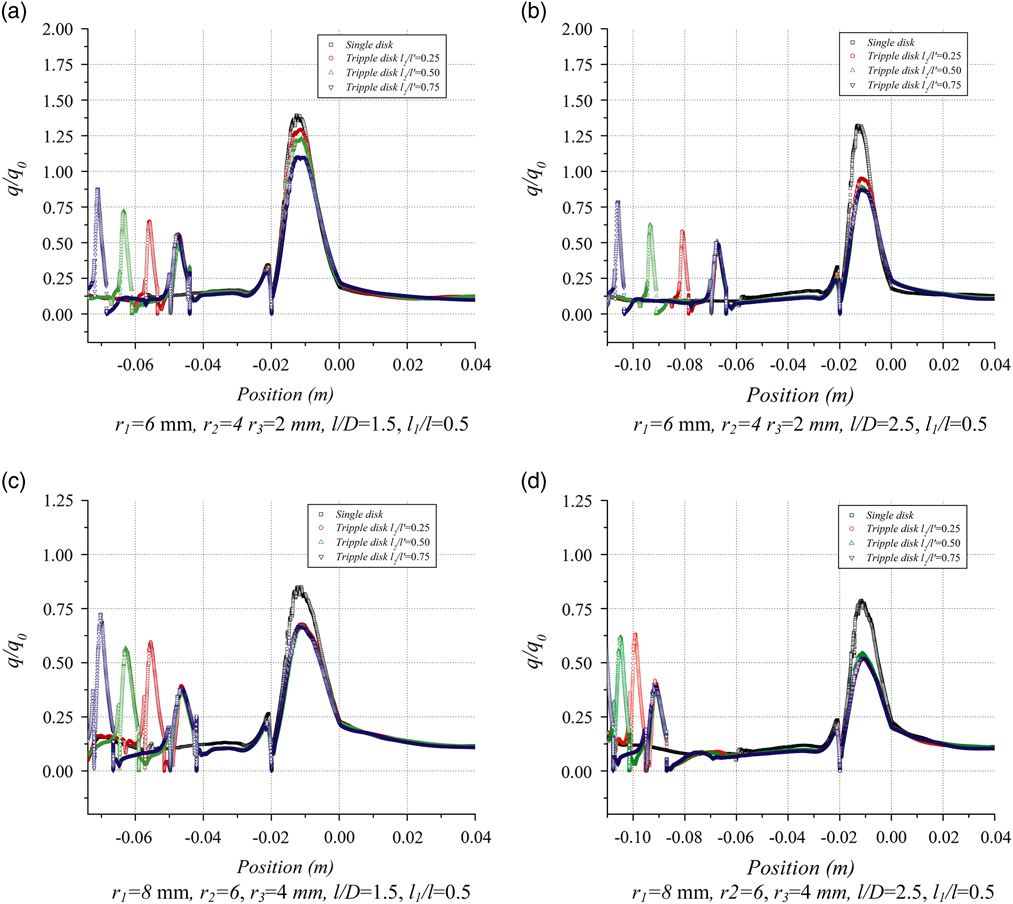
Figure 11 (Colour online) Surface heat flux distribution for selected three-disk spiked configurations.
As can be seen in Fig. 11, there is a severe reattachment heating on shoulders of base body for three-disk configurations with r 1=6 mm, r 2=4 mm and r 3=2 mm for l/D=1.5. The values of reattachment heat fluxes are about 30–59% higher than the stagnation point heat fluxes of base configuration, for l 1 /l=0.25 and about 10–37% higher for l 1 /l=0.5. For larger l/D values and as the rear aerodisk is moved forward, some respite in peak reattachment heat fluxes is observed. At an l/D=2.5, reductions of 5–12% for l 1 /l=0.5 and of 9–21% for l 1 /l=0.75 is observed, with the aerodisks of radii r 1=6 mm, r 2=4 mm and r 3=2 mm. As the aerodisk size is increased, more reductions in local heating can be observed. For three-disk configurations with r 1=8 mm, r 2=6 mm and r 3=4 mm, the peak reattachment heat flux is lower than that of the base configuration for the shortest of aerospikes investigated. These reductions are enhanced as the l/D of the aerospike is increased or as the rear aerodisk is moved forward as can be seen in Fig. 11. For three aerodisk configurations with disk sizes r 1=8 mm, r 2=6 mm and r 3=4 mm, and l/D=1.5, reductions in heat fluxes of up to 26%, 33% and 36% were obtained respectively for l 1 /l of 0.25, 0.5 and 0.75. For longer aerospikes with l/D=2.5, the reductions were enhanced to 38%, 50% and 48%, respectively, for l 1 /l of 0.25, 0.5 and 0.75. A slightly diminished reduction in local surface heat fluxes at l 1 /l=0.75 is because of the shear layer detaching aft of the rear aerodisk for these cases and hitting the main body at steep angles resulting in higher aftershock temperatures.
The increased local surface heat fluxes for smaller l/D values are because of the fact that for the smaller l/D ratios, the shear layer detaches from the spike well ahead of the mid aerodisk. It then hits the mid aerodisk, dissipating a small fraction of the heat to it, before hitting the rear aerodisk and finally impinging on the shoulders of the main body. For these cases, the shear layer is inclined to the main body at higher angle before the reattachment, causing a large after shock temperature and velocity gradient on the shoulders of the main body as can be seen in Fig. 12(a) and (b). The large temperature and velocity gradient induced causes a large heat fluxes aft of the reattachment shock wave. For longer aerospikes, the shear layer detaches just ahead of the mid aerodisk, strikes it, dissipating a large amount of heat. Thereafter the shear layer attaches on the spike stem before detaching again to the hit the rear aerodisk, dissipating further amount of heat to the rear aerodisk. Finally, a very weak shear layer inclined at very low angles to the aerospike attaches to the main body, as can be seen in Fig. 12(c) and (d), dissipating considerably lower heat fluxes. For the same l/D values, shear layer for the configurations with larger radii disks are deflected away effectively by the intermediate disk and become less inclined to the spike axis. This results in relatively lower post-shock temperature and hence a reduced local heating.

Figure 12 (Colour online) Contours of temperatures for three-disk configurations with disk sizes.
Figure 13 shows the total heat transfer rates to the main body of the spiked configurations with three disks, normalised with the total heat transfer rates to the base configuration. As can be seen in Fig. 13(a) and (b), for disk size of r 1=6 mm, r 2=4 mm and r 3=2 mm, there is an increase in the total transfer rates to the main body. The total heat transfer rates, however, reduce as the l/D of the spike is increased or as the rear aerodisk is moved forward or as the mid disk is moved forward a given l/D ratio. For l/D ratio of 1, the heating rate as high as 33% more than that of base body stagnation heat transfer rate is observed at l 1 /l=0.25 and l 2 /l’=0.25. With a disk size of r 1=6 mm, r 2=4 mm and r 3=2 mm, the only case wherein some reduction total heat transfer rates are observed is the configuration with l 1 /l=0.75 and l 2 /l’=0.75, giving a small reduction of 7% in total heat transfer rates. The larger sized aerodisks with disk size of r 1=8 mm, r 2=6 mm and r 3=4 mm offer much-favoured reductions in total heat transfer rates to the main body. Even for an l/D=1.0, the heating rates are comparable to that for the base configurations. With an increase in the l/D ratio, a reduction of about 20% can be achieved at a lower l 1 /l value of 0.25 as can be seen in Fig. 13(c). For this l 1 /l of 0.25, as the l/D ratio is increased from 2 to 2.5 for an l 2 /l’ of 0.25, the total heating rate remains unchanged at about 13% lower than the base body heating.

Figure 13 (Colour online) Total heat transfer rates for various three aerodisk configurations.
Such a behaviour is observed primarily because of the largest aerodisk dominating the heat transfer rates to the main body. For this configuration, the shear layer detaches ahead of the mid aerodisk and strikes the rear aerodisk which dissipates a large amount of heat. As the rear disk is very large and very close to the main body, an increase in l/D by 0.5 does not alter the configuration of shear layer much and hence a similar total heat transfer rates. For larger values of l 1 /l and with longer aerospikes, the triple hemispherical aerodisks can give up to 27% reduction in total transfer rates as can be seen in Fig. 13(d).
3.8 Comparisons between single, double and three-disk aerospikes
The effectiveness of aerospikes and aerodisks in reducing aerodynamic drag at supersonic and hypersonic speeds is already established. Its effect on aerodynamic heating is, however, not very clear and depends a lot on the behaviour of the boundary layer. The addition of multiple disks on the aerospike seems to reduce the aerodynamic drag further. For the single-disk configuration with a disk radius of 4 mm, there is about 59% reduction in drag at l/D=1.5. The two-disk configurations with the same radii of front aerodisk give drag reductions of 60% and 65% at l 1 /l=0.5 and l 1 /l=0.75, respectively, for l/D=1.5. The three-disk configurations with the same front disk size give 66–67% reductions in drag for a l/D ratio of 1.5. Thus, for smaller l/D ratios, the multiple disks give a marginal advantage over single-disk aerospike for drag reduction. For longer aerospikes, the situation improves slightly. At a l/D ratio of 2.5, the 4 mm single aerodisk offers about 62% reduction in drag while the two-disk aerospikes offer 68% and 70% reductions at l 1 /l=0.5 and 0.75, respectively. The three-disk configurations offer a still higher reduction between 73% and 74% in aerodynamic drag. The reductions in the drag for spiked configurations with multiple aerodisks are due to reduced peak reattachment pressure on the shoulders of the main body. These peak reattachment pressures fall gradually as the number of aerodisks is increased from zero to three. As compared to the single-disk aerospikes, at l/D=2.5, the peak reattachment pressure is reduced by approximately 25% for two-disk configurations and by 50% for the three-disk spiked configurations. These reductions in peak reattachment pressures are, however, not translated completely into drag reductions as there are only small added reductions in drag as the number of disks is increased from one to two and three, as is evident in Table 3.
Table 3 Reductions in drag and heat fluxes

These diminished reductions are because as the number of aerodisks increases, the wetted surface area increases, which in turn increase the viscous drag. In addition, as the size of the disks increases, the peak pressures on the aerodisks increase, the kinetic energy of the fluid wetting the main body is less, which results in lowered reattachment pressure on the main body. However, the increased pressures on the relatively larger aerodisks mean a slight increase in the overall drag of the configuration. Despite large local heat fluxes at the front and the intermediate aerodisk, the reattachment heat flux at the point of reattachment of the shear layer on the shoulder of the main body is relatively very high. For very small radii of the front aerodisk i.e. r 1=2 mm, the peak reattachment heat flux is higher than that for the base configuration, represented with a negative sign in Table 3. However, for the larger aerodisk spiked configurations, the peak reattachment heat fluxes are lower than that of the base configurations. For aerodisks with front disk radius of 4 mm, the reduction of 15% in peak heat fluxes at l/D=1.5 improves to 27% with two aerodisks and improves further to 33% with three hemispherical aerodisks. At a higher l/D ratio of 2.5, the reduction of 21% with a single hemispherical disk with radius 4 mm improves to 33% with two aerodisks and to 50% with three aerodisks with the same radius of the front aerodisk. The superiority of multiple disk spiked configuration over single aerodisk configurations in reducing peak reattachment heat fluxes is thus squarely established. The above statement is true more so for longer spikes with large l/D values. For aerodisk with l/D=1.5, the single-disk configuration offers an insignificant reduction of 3% in total heat transfer rates while the configurations with two and three aerodisks offer reductions of up to 9% and 16%, respectively. For longer aerospikes of l/D=2.5, these reductions go up to 8% for single aerodisk, 19% for two-disk spiked configurations and 27% for the three aerodisk configurations.
4.0 CONCLUSION
Numerical simulations of a hypersonic flow over spiked blunt bodies with one, two or three hemispherical aerodisks were carried out using a commercially available finite volume code for a Mach number of 6.2. The trends for single-disk spiked configurations in drag reductions are in line with the literature. The single aerodisk of 6 mm offers a reduction in drag of about 67% and a 45% reduction in peak reattachment heat flux, both for an l/D=2.5. The use of multiple disk aerospike enhances the reductions in drag and aerodynamic heating. For two-disk spiked configurations reductions of about 24–66% is observed, with the highest reductions observed for an l/D ratio of 2.5. The drag reduction for the two and three-disk aerospikes improves with the forward movement of the intermediate aerodisks as it increases the area of recirculating region of flow between the aerodisks, which produces suction in the forward direction. For few configurations with larger rear disk, positioned at very forward positions with combination both large l/D and l 1 /l; however, the high drag on the rear aerodisk neutralises the reductions for the main body. The drag hence ceases to reduce with an increase in l 1 /l ratio for these cases.
For most configurations, the highest l/D ratio gave the highest reductions in both drag and aerodynamic heating. The double disk aerospike offers up to 65% reduction in peak heat fluxes with the rear disk at 0.75 of the total length of the spike. For the same front disk radius of 4 mm, the single aerodisk offers a 62% reduction in drag while the two-disk aerospikes offer 68% and 70% reductions at l 1 /l=0.5 and 0.75, respectively. The three-disk configurations offer a still higher reduction between 73% and 74% in aerodynamic drag. The trends in reduction of heat transfer rates are also similar to drag reductions. At the highest l/D, the reduction of 21% with a single disk of radius 4 mm improves to 33% with two aerodisks and to 50% with three aerodisks. As far as the reductions total heat transfer rates are concerned, aerospikes offer reductions of up to 8% with single aerodisk, 19% with two disks and 27% for the three disks.
It is clear that two-disk aerospikes outperform single aerodisk configuration in terms of both heat and drag reductions. The three-disk aerospikes also outperform the two-disk aerospikes, but with only a marginal improvement in drag reductions over the two-disk configurations of the same length and front disk size. All the reductions provided by the multiple aerodisk configurations improve with increasing radii of the aerodisks, except for very long aerospikes with large disk radii. Thus, the author is of the opinion that multiple disk aerospikes is an efficient means of drag and heat reduction and further elaborate research should be conducted in this area.
ACKNOWLEDGEMENT
All the simulations for this investigation were carried out on CFD Server in the Computational Fluid Dynamics Laboratory at the University of Petroleum and Energy Studies. I would like to thank the University management for providing me the necessary support required for the simulations. In addition, I would like to thank the Chancellor and the Vice Chancellor of the University to have financially supported my research. The authors confirm that there are no known conflicts of interest associated with this publication.